1. Considerations and Limitations
Before proceeding, take note of the following:- “My Workspace” is not supported when using a service principal.
- Only embedding of reports and dashboards is supported.
- Users cannot sign in to the Power BI portal using a service principal.
- Power BI Admin rights are required to enable the service principal in Developer settings.
- Dataflows management is not supported.
- Minimum browser versions required:
- Chrome: 95
- Firefox: 94
- Edge: 120
- Workspaces require capacities, which may incur additional costs.
- Power BI reports using Row-Level Security (RLS) are not supported.
Power BI Embedded Documentation Failure to set a capacity can result in a warning above your reports/dashboards or prevent them from displaying in the PADS4 Viewer.
2. Register an App in Microsoft Azure
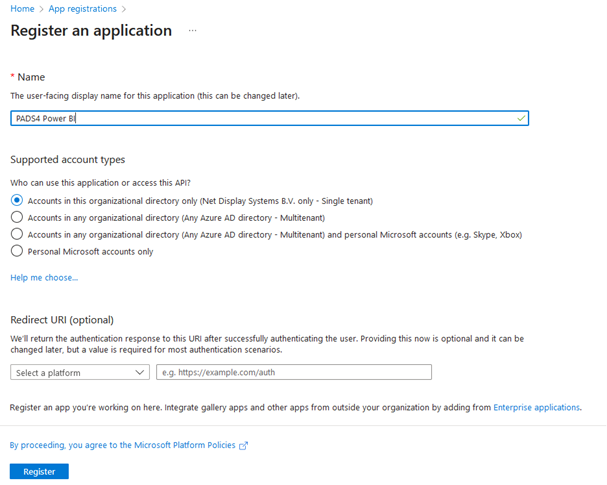
To integrate Power BI with PADS4, a new App Registration is required in Microsoft Azure.Step 1: Create a New App Registration
- Open the Azure Portal.
- Navigate to Azure Active Directory > App Registrations.
- Click New Registration.
- Enter the following values:
- Name: Any reference name.
- Supported Account Types:
Select Single-tenant or Multi-tenant as per your requirements.
Do not enable personal Microsoft accounts. - Redirect URI:
This is not required for Power BI integration.
- Click Register.
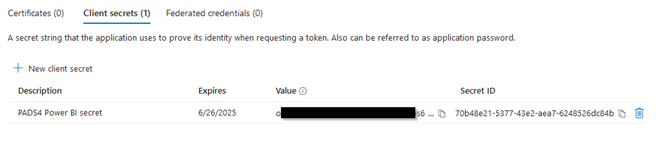
Step 2: Create a Client Secret
- Go to Certificates & Secrets in the left menu.
- Select Client Secrets.
- Click New Client Secret.
- Enter a description and select an expiration duration.
- Ensure a new Client Secret is created before expiration.
- Click Add.
- Copy the generated Client Secret Value immediately, as it will not be visible later.
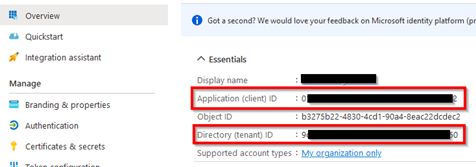
Step 3: Gather Required Information
PADS4 requires the following values for Power BI integration:| Required Value | Where to Find It? |
|---|---|
| Application (Client) ID | App Registration Overview |
| Directory (Tenant) ID | App Registration Overview |
| Client Secret | Certificates & Secrets |
3. Enable Power BI Service Admin Settings
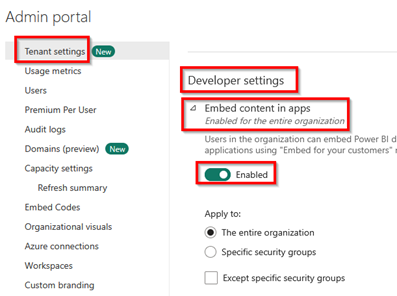
To use the service principal for Power BI integration, follow these steps:- Log in to the Power BI Admin portal.
- Navigate to Tenant Settings.
- Scroll down to Developer Settings.
- Expand Embed Content in Apps.
- Enable Embed Content in Apps.
- Choose the scope:
- Entire organization (default).
- Specific security groups (if a security group was created).
- Click Save.
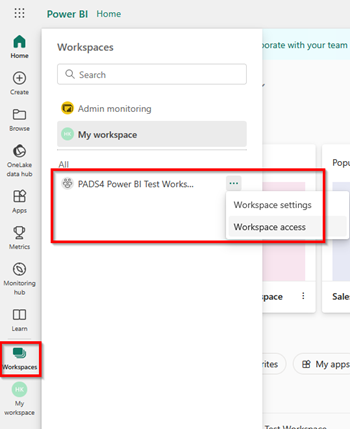
4. Add the Service Principal to a Power BI Workspace
To allow PADS4 to access Power BI reports and dashboards, the service principal must be added to a Power BI Workspace.Steps:
- Log in to Power BI Home.
- Click on Workspaces in the left menu.
- Find the Workspace you want to use and open More Options.
- Select Workspace Access.
- Click Add People or Groups.
- Search for the App Registration name (created in Azure).
- Add it as Member or Admin.
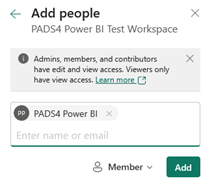
- Click Save.
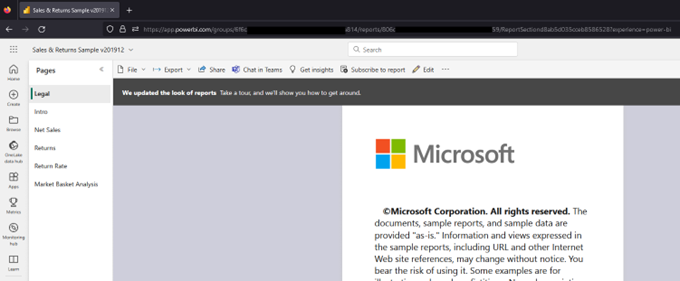
5. Retrieve Power BI Workspace and Report/Dashboard IDs
To display Power BI content in PADS4, you need the Workspace ID and Report/Dashboard ID.Find the IDs in the Power BI URL
- Open the Power BI report or dashboard.
- Check the URL format:
Reports Example:
- Workspace ID: Found between
groups/and/reports. - Report ID: Found between
/reports/and/ReportSection.
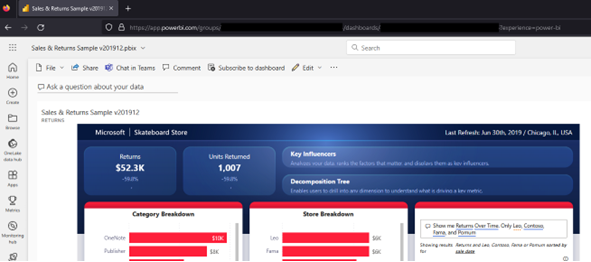
Dashboards Example:
- Workspace ID: Found between
groups/and/dashboards. - Dashboard ID: Found after
/dashboards/.
6. Add Power BI Integration in PADS4 CTRL Center
Step 1: Register the App in PADS4 Credential Manager
- Log in to PADS4 CTRL Center.
- Open Credentials under the Administration menu.
- Click Providers.
- Click New and select Microsoft Power BI.
- Enter the following values:
- App name.
- Application (Client) ID.
- Directory (Tenant) ID.
- Client Secret.
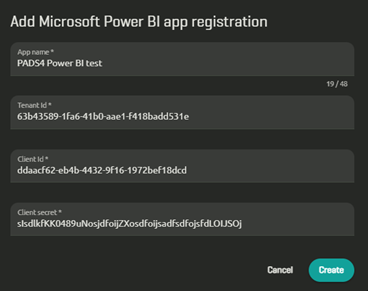
- Click Create.
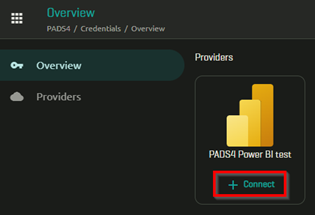
Step 2: Register Power BI Report/Dashboard in PADS4
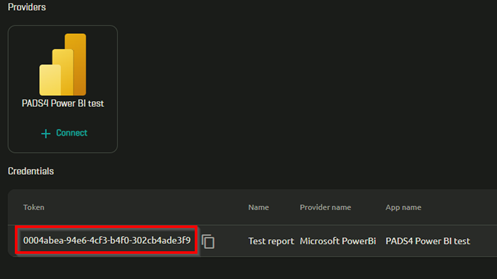
- Go to Overview in Credential Manager.
- Find the App Registration you added.
- Click Connect.
- Enter the following details:
- Workspace ID.
- Type (Report or Dashboard).
- Report/Dashboard ID.
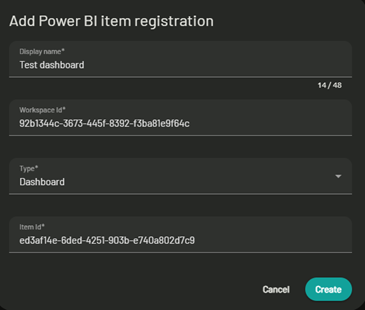
- Click Create.
7. Show Power BI Reports/Dashboards in PADS4 Viewers
To display Power BI content on PADS4 Viewers, use the following URL format:URL Breakdown:
- Protocol:
httporhttps(usehttpsif using a valid public SSL certificate). - Host: DNS name or IP address of the PADS4 Server.
- Port: Optional (specify only if not using default HTTP/HTTPS ports).
- Token ID: Generated in Credential Manager.
Example:
8. Final Steps
- Ensure the Power BI Service Principal is added to Workspaces.
- Verify all API permissions are enabled in Power BI Admin settings.
- Check that the Power BI capacities are set to avoid access warnings.