How to add the Philips Hue Bridge to PADS4
To add a Philips Hue Bridge, you must plug in the power cable and ethernet cable in the Bridge. After a couple moments, the Bridge should be up and running and display at least the following indicators which means the Bridge is started and connected to your local network.
- Use a DNS discovery app to find the Philips Bridge in your network.
- Use their discover process by visiting https://discovery.meethue.com/.
- Log into the (wireless) network router and look for Philips Hue (or similar) in the DHCP table.

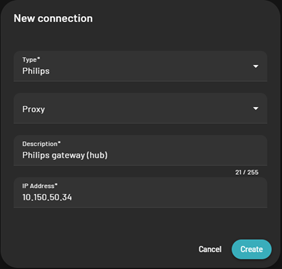
- You can use the IP-address in the PADS4 IoT application to add the gateway to your PADS4 Server and, optionally, select the proxy that may connect to the Philips Hue Bridge:
- When you add the Philips Hue Bridge as a gateway in PADS4 Ctrl Center, you may see an error message as below.
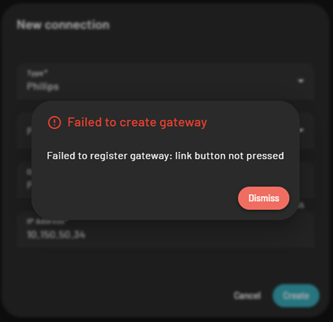
- In that case, you must click the Philips button on top of the Bridge before you add the gateway to put the Bridge in linking mode and allow PADS4 to connect with it.
- If there are any devices connected to it or that will connect to it later, you may see them in the PADS IoT application on the devices list. That may look like this:

Auto-Discover Devices
PADS4 allows you to automatically pair Philips devices (sensors and LEDs/lights) with the Philips Hue Bridge without using the Philips Hue Bridge. To do this you must click the Discover Devices button just above the list of gateways in PADS4 Ctrl Center, but only after you have set your sensors and/or LEDs into pairing mode.
This is not required to get the devices into PADS4. You can still pair the device using the Philips Hue app and PADS4 will automatically synchronize the devices from the Bridge into PADS4 Ctrl Center.