> ## Documentation Index
> Fetch the complete documentation index at: https://docs.pads4.com/llms.txt
> Use this file to discover all available pages before exploring further.
# Exchange online
[EWS in Exchange Online will be End of Life in Q4 - 2026](https://learn.microsoft.com/en-us/exchange/clients-and-mobile-in-exchange-online/deprecation-of-ews-exchange-online), please make sure to migrate your registered application to make use of the Microsoft Graph API as follows when you have an existing application registered as below:
Make sure to add the following permissions to your existing application registration:
| Permission | Required | Description |
| --------------------------------------- | -------- | ----------------------------------------------------------------------- |
| **Calendars.ReadWrite** | Yes | Read and synchronize room calendar events. |
| [Place.Read](http://Place.Read)**.All** | Optional | Required only when importing rooms from Microsoft Places or Room Lists. |
After updating the permissions, **Administrator Consent** must be granted to the application before the service can authenticate successfully.
Within PADS4 - CMS 1.0 Admin, the Calendar configuration must then be updated:
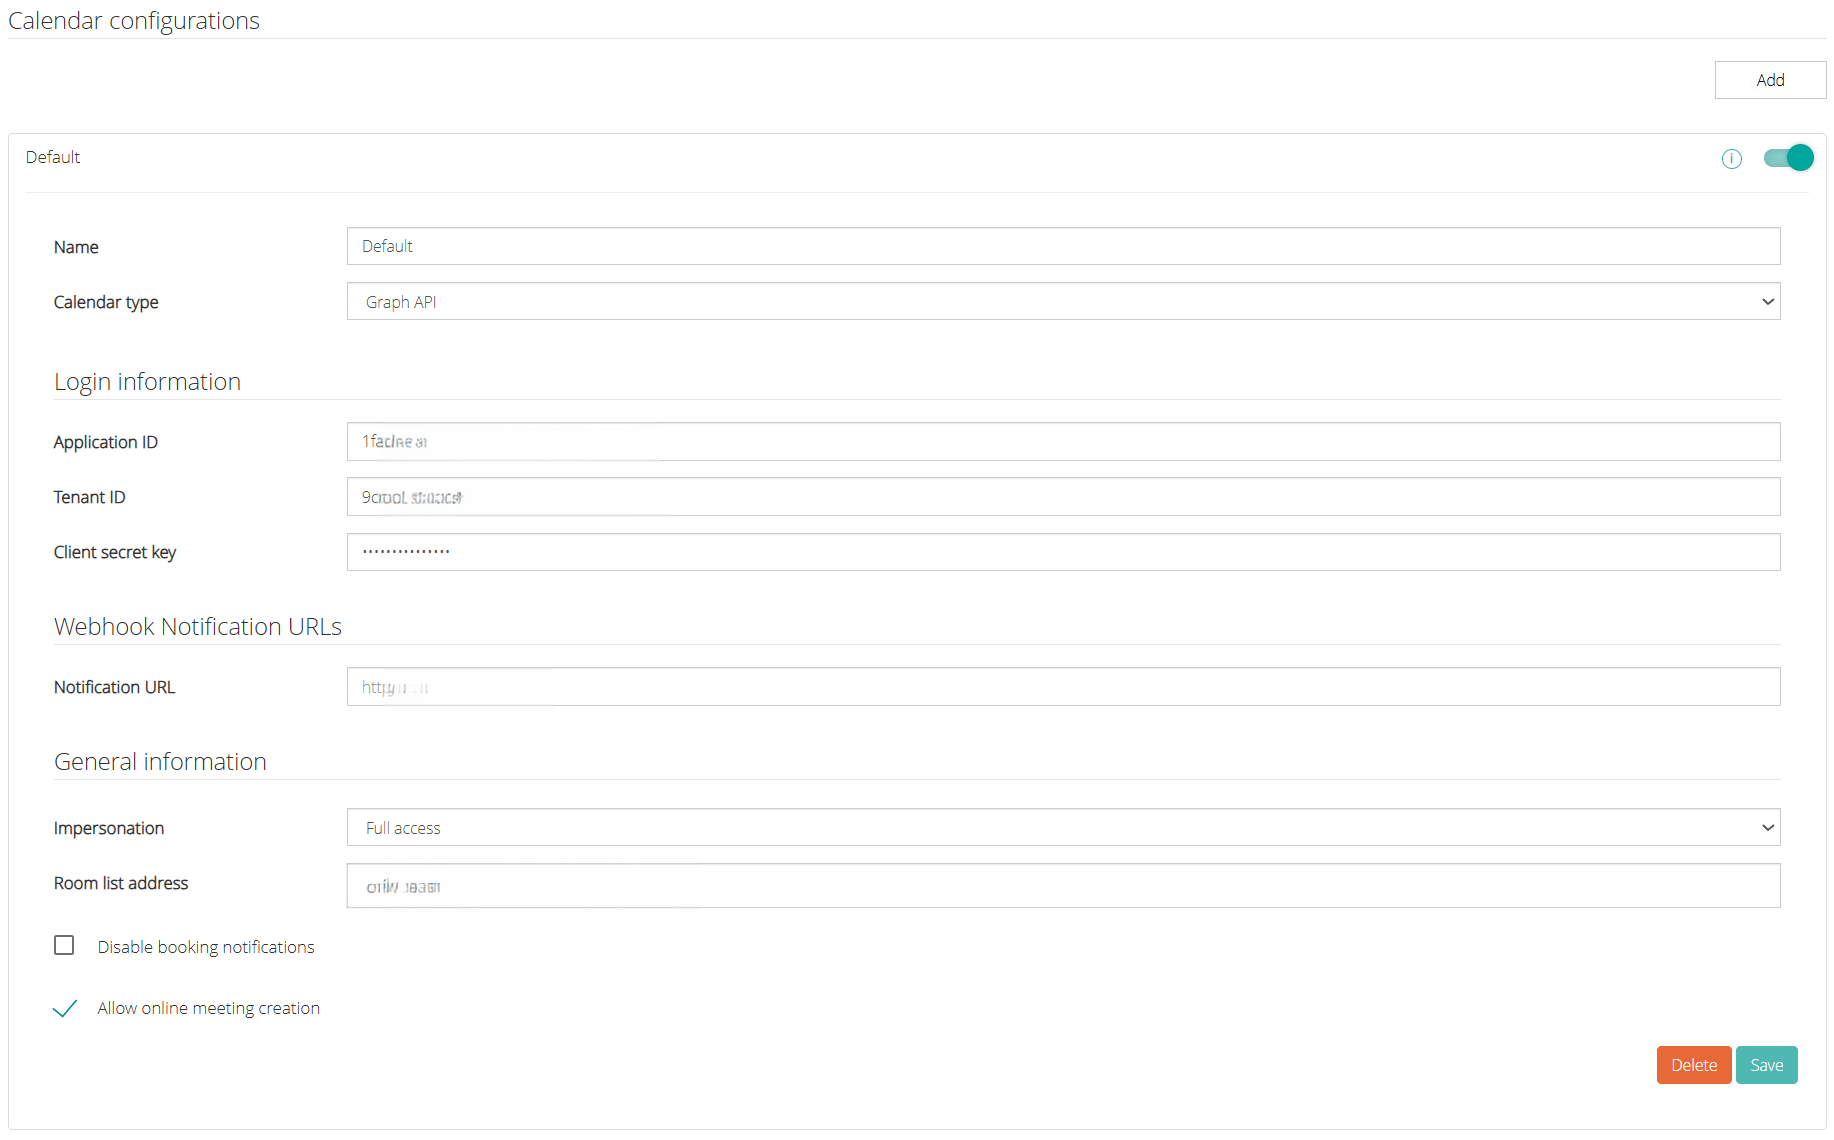 * Change the calendar provider from **Exchange O365** to **Graph API**.
* Configure the **Webhook Notification URL**, if required. This setting is optional when the notification endpoint uses the same DNS host name already configured for the application.
*The webhook notification endpoint must be publicly accessible over HTTPS to receive Microsoft Graph change notifications.*
Microsoft renamed Azure Active Directory to Microsoft Entra ID. When authenticating with the new OAuth 2.0 setting within Exchange 365 (Azure), you will need a different type of account verification. You will need to add the PADS4 CMS/Workspace app within Microsoft Entra ID and add a service account. Follow the steps below to configure your Microsoft Entra ID environment for use with PADS4. Register the application
1. Open a browser and navigate to the Microsoft Entra ID admin center and login using a personal account (aka: Microsoft Account) or Work or School Account.
2. Select Identity in the left-hand navigation, then select App registrations under Applications.
* Change the calendar provider from **Exchange O365** to **Graph API**.
* Configure the **Webhook Notification URL**, if required. This setting is optional when the notification endpoint uses the same DNS host name already configured for the application.
*The webhook notification endpoint must be publicly accessible over HTTPS to receive Microsoft Graph change notifications.*
Microsoft renamed Azure Active Directory to Microsoft Entra ID. When authenticating with the new OAuth 2.0 setting within Exchange 365 (Azure), you will need a different type of account verification. You will need to add the PADS4 CMS/Workspace app within Microsoft Entra ID and add a service account. Follow the steps below to configure your Microsoft Entra ID environment for use with PADS4. Register the application
1. Open a browser and navigate to the Microsoft Entra ID admin center and login using a personal account (aka: Microsoft Account) or Work or School Account.
2. Select Identity in the left-hand navigation, then select App registrations under Applications.
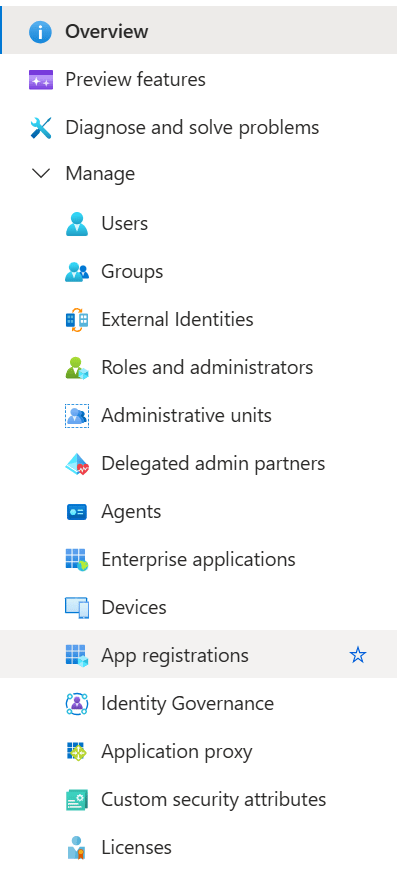 3. Select New registration. On the Register an application page, set the values as follows.
a. Set Name to a friendly name for your app.
b. Set Supported account types to the choice that makes sense for your scenario.
c. For Redirect URI, change the dropdown to Public client (mobile & desktop) and set the value to: **urn:ietf:wg:oauth:2.0:oob**
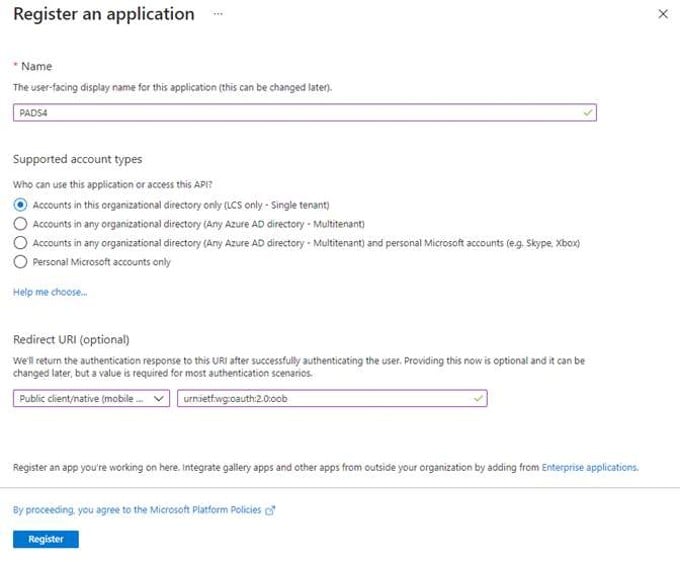 4. Choose Register. On the next page, copy the values of the **Application (client) ID** and **Directory (tenant) ID** and save them, you will need them later to configure the calendar plugin in CMS.
# Configure for app-only authentication
To use application permissions, follow these additional steps.
1. Select **Manifest** in the left-hand navigation under **Manage**.
2. Locate the **requiredResourceAccess** property in the manifest, and add the following inside the square brackets (\[]):
`{`
4. Choose Register. On the next page, copy the values of the **Application (client) ID** and **Directory (tenant) ID** and save them, you will need them later to configure the calendar plugin in CMS.
# Configure for app-only authentication
To use application permissions, follow these additional steps.
1. Select **Manifest** in the left-hand navigation under **Manage**.
2. Locate the **requiredResourceAccess** property in the manifest, and add the following inside the square brackets (\[]):
`{`
` "resourceAppId": "00000002-0000-0ff1-ce00-000000000000",`
` "resourceAccess": [`
` {`
` "id": "dc890d15-9560-4a4c-9b7f-a736ec74ec4e",`
` "type": "Role"`
` }`
` ]`
`}`
3. Select **Save**.
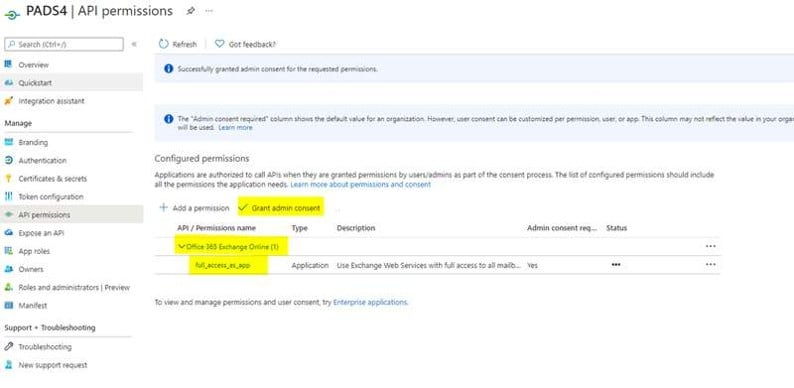
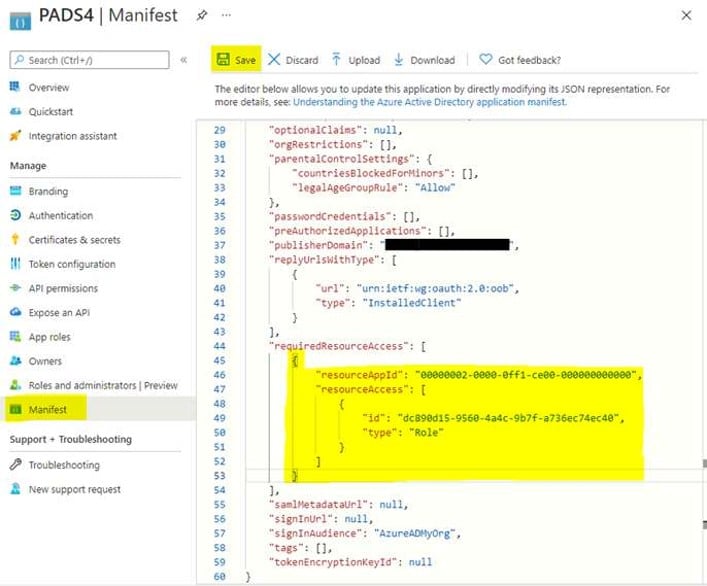 4. Select API permissions under Manage. Confirm that the **full\_access\_as\_app** permission is listed.
5. Select **Grant admin consent** for org and accept the consent dialog.
4. Select API permissions under Manage. Confirm that the **full\_access\_as\_app** permission is listed.
5. Select **Grant admin consent** for org and accept the consent dialog.
 In case you want to add Microsoft Teams meeting support to Workspace, continue the configuration below. If you do not want to add Microsoft Teams meeting support you can proceed to step 9.
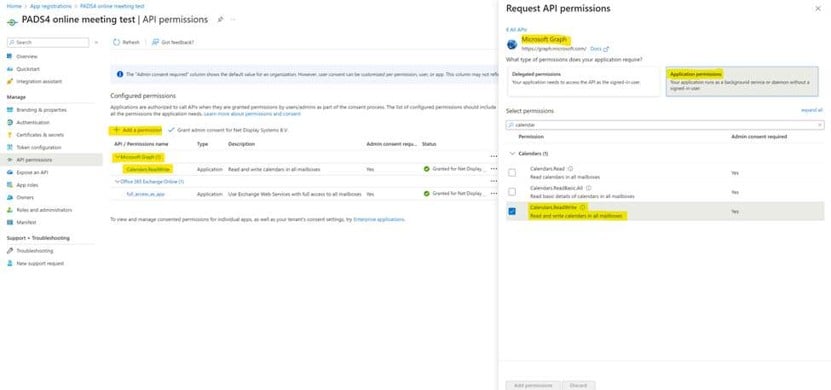
6. Select Add a permission
7. Select the following permission "**Microsoft Graph > Calendars.ReadWrite**" and select Add.
8. Grant admin consent to that permission.
In case you want to add Microsoft Teams meeting support to Workspace, continue the configuration below. If you do not want to add Microsoft Teams meeting support you can proceed to step 9.
6. Select Add a permission
7. Select the following permission "**Microsoft Graph > Calendars.ReadWrite**" and select Add.
8. Grant admin consent to that permission.
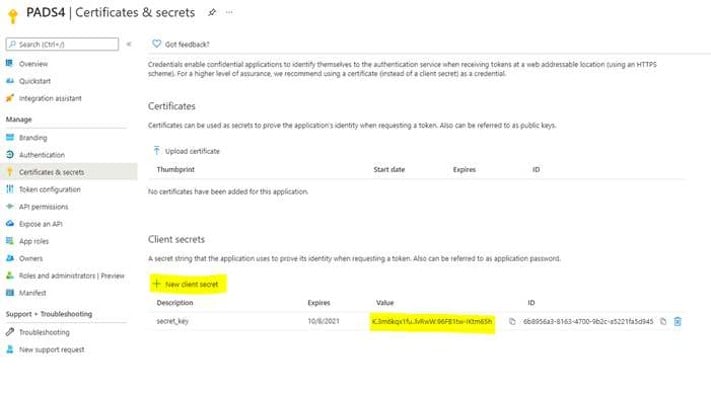
 9. Select Certificates & Secrets in the left-hand navigation under Manage.
10. Select New client secret, enter a short description and select Add.
11. Copy the Value of the newly added client secret and save it, you will need it later when configuring the calendar plugin in CMS.
9. Select Certificates & Secrets in the left-hand navigation under Manage.
10. Select New client secret, enter a short description and select Add.
11. Copy the Value of the newly added client secret and save it, you will need it later when configuring the calendar plugin in CMS.
 # Create a service account user
1. Log in to your Office 365 as an administrator.
2. Navigate to **Office 365 admin center > USERS > Active Users**.
3. To add a new user, select the "+" icon. The create new user account page appears.
4. On the **create new user account** page, complete the required information.
a. Enter the first name, last name, display name, user name, and your email domain.
b. Select **Type password** and enter the password for the service account.
c. Deselect the **Make this person change their password the next time they sign in** check box.
d. Assign at least an Exchange Online license.
e. Enter the email address of the recipient to whom the password must be sent. Select **Create**.
f. Select **Close**.
By default, Exchange will change the subject of the meeting to the Organizer's name. To change this you would need to change the Calendar Processing of the room(s) that you will use.
1. Connect to Exchange Online PowerShell. For details, see Connect to Exchange Online PowerShell.
2. Run the following command, where \ the name of your room should be.
```text theme={null}
Set-CalendarProcessing -Identity \ -DeleteSubject \$false -AddOrganizerToSubject \$false -DeleteComments \$false
```
Now the Subject will stay the subject that you have specified in the booking creation, and won't change to the Organizer of the booking.
# Manage restricted access (if required)
if you added an application access policy, you will need first to include the service account in the restricted access distribution group
To configure an application access policy and limit the scope of application permissions:
1. Connect to Exchange Online PowerShell. For details, see Connect to Exchange Online PowerShell.
2. Identify the app's client ID and a mail-enabled security group to restrict the app's access.
a. Identify the app's application (client) ID in the Azure app registration portal.
b. Create a new mail-enabled security group or use an existing one and identify the email address for the group.
c. Make sure to add your service account and the room(s) that you want to use to the mail-enabled security group.
3. Create an application access policy.
Run the following command, replacing the **AppId**, **PolicyScopeGroupId**, and **Description** arguments.
```text theme={null}
New-ApplicationAccessPolicy -AppId e7e4dbfc-046f-4074-9b3b-2ae8f144f59b -PolicyScopeGroupId [mydistributiongroup@contoso.com](mailto:mydistributiongroup@contoso.com) -AccessRight RestrictAccess -Description "Restrict this app to members of distribution group."
```
4. Test the newly created application access policy.
Run the following command, replacing the **AppId** and **Identity** arguments.
```text theme={null}
Test-ApplicationAccessPolicy -Identity [room01@contoso.com](mailto:room01@contoso.com) -AppId e7e4dbfc-046f-4074-9b3b-2ae8f144f59b
```
The output of this command will indicate whether the app has access to room01 mailbox.
Changes to application access policies can take up to 30 minutes to take effect in EWS API calls.
# Manage room list (for retrieving rooms to import)
* To be able to import rooms in Workspace you need to create a room list and add the rooms that want to be able to import to the room list. If you don't do this, then you need to manually add the rooms to Workspace. We advise to use a room list as this is more convenient then adding rooms manually.
* Attention, a room list should not contain more than 100 rooms, if you plan to have more, please split them into multiple room list as the maximum number of rooms that can be returned in the request for a Room List is 100.
1. Connect to Exchange Online PowerShell. For details, see Connect to Exchange Online PowerShell.
2. Use the Exchange Management Shell to create a room list
```text theme={null}
New-DistributionGroup -Name "MyRoomList" -RoomList
```
3. Use the Exchange Management Shell to add a room to a room list
```text theme={null}
Add-DistributionGroupMember -Identity "MyRoomList" -Member [room01@contoso.com](mailto:room01@contoso.com)
```
4. To check if the room list has been successfully created you can use the following command to see if the list exists.
```text theme={null}
Get-DistributionGroup -Identity "Room list name"
```
When you have successfully set up the app registration & created the service account you can fill in the Calendar plugin configuration inside the CMS admin portal.
# Create a service account user
1. Log in to your Office 365 as an administrator.
2. Navigate to **Office 365 admin center > USERS > Active Users**.
3. To add a new user, select the "+" icon. The create new user account page appears.
4. On the **create new user account** page, complete the required information.
a. Enter the first name, last name, display name, user name, and your email domain.
b. Select **Type password** and enter the password for the service account.
c. Deselect the **Make this person change their password the next time they sign in** check box.
d. Assign at least an Exchange Online license.
e. Enter the email address of the recipient to whom the password must be sent. Select **Create**.
f. Select **Close**.
By default, Exchange will change the subject of the meeting to the Organizer's name. To change this you would need to change the Calendar Processing of the room(s) that you will use.
1. Connect to Exchange Online PowerShell. For details, see Connect to Exchange Online PowerShell.
2. Run the following command, where \ the name of your room should be.
```text theme={null}
Set-CalendarProcessing -Identity \ -DeleteSubject \$false -AddOrganizerToSubject \$false -DeleteComments \$false
```
Now the Subject will stay the subject that you have specified in the booking creation, and won't change to the Organizer of the booking.
# Manage restricted access (if required)
if you added an application access policy, you will need first to include the service account in the restricted access distribution group
To configure an application access policy and limit the scope of application permissions:
1. Connect to Exchange Online PowerShell. For details, see Connect to Exchange Online PowerShell.
2. Identify the app's client ID and a mail-enabled security group to restrict the app's access.
a. Identify the app's application (client) ID in the Azure app registration portal.
b. Create a new mail-enabled security group or use an existing one and identify the email address for the group.
c. Make sure to add your service account and the room(s) that you want to use to the mail-enabled security group.
3. Create an application access policy.
Run the following command, replacing the **AppId**, **PolicyScopeGroupId**, and **Description** arguments.
```text theme={null}
New-ApplicationAccessPolicy -AppId e7e4dbfc-046f-4074-9b3b-2ae8f144f59b -PolicyScopeGroupId [mydistributiongroup@contoso.com](mailto:mydistributiongroup@contoso.com) -AccessRight RestrictAccess -Description "Restrict this app to members of distribution group."
```
4. Test the newly created application access policy.
Run the following command, replacing the **AppId** and **Identity** arguments.
```text theme={null}
Test-ApplicationAccessPolicy -Identity [room01@contoso.com](mailto:room01@contoso.com) -AppId e7e4dbfc-046f-4074-9b3b-2ae8f144f59b
```
The output of this command will indicate whether the app has access to room01 mailbox.
Changes to application access policies can take up to 30 minutes to take effect in EWS API calls.
# Manage room list (for retrieving rooms to import)
* To be able to import rooms in Workspace you need to create a room list and add the rooms that want to be able to import to the room list. If you don't do this, then you need to manually add the rooms to Workspace. We advise to use a room list as this is more convenient then adding rooms manually.
* Attention, a room list should not contain more than 100 rooms, if you plan to have more, please split them into multiple room list as the maximum number of rooms that can be returned in the request for a Room List is 100.
1. Connect to Exchange Online PowerShell. For details, see Connect to Exchange Online PowerShell.
2. Use the Exchange Management Shell to create a room list
```text theme={null}
New-DistributionGroup -Name "MyRoomList" -RoomList
```
3. Use the Exchange Management Shell to add a room to a room list
```text theme={null}
Add-DistributionGroupMember -Identity "MyRoomList" -Member [room01@contoso.com](mailto:room01@contoso.com)
```
4. To check if the room list has been successfully created you can use the following command to see if the list exists.
```text theme={null}
Get-DistributionGroup -Identity "Room list name"
```
When you have successfully set up the app registration & created the service account you can fill in the Calendar plugin configuration inside the CMS admin portal.
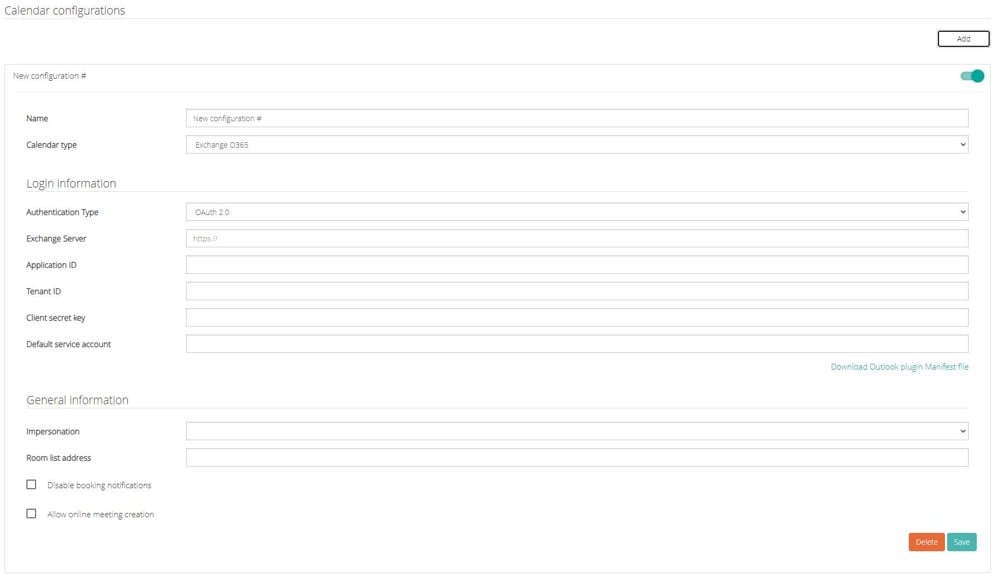 **Exchange Server:** [http://outlook.office365.com](http://outlook.office365.com) / example
**Application ID:** The application ID from Azure
**Tenant ID:** The directory tenant ID from Azure
**Client secret Key:** The client secret key from Azure.
**Default service account:** The default service account from Azure directory for retrieving the access.
**Impersonation:** Described below
**Room list address:** The SMTP URL of the room list that you have configured. This will allow you to import rooms in Workspace.
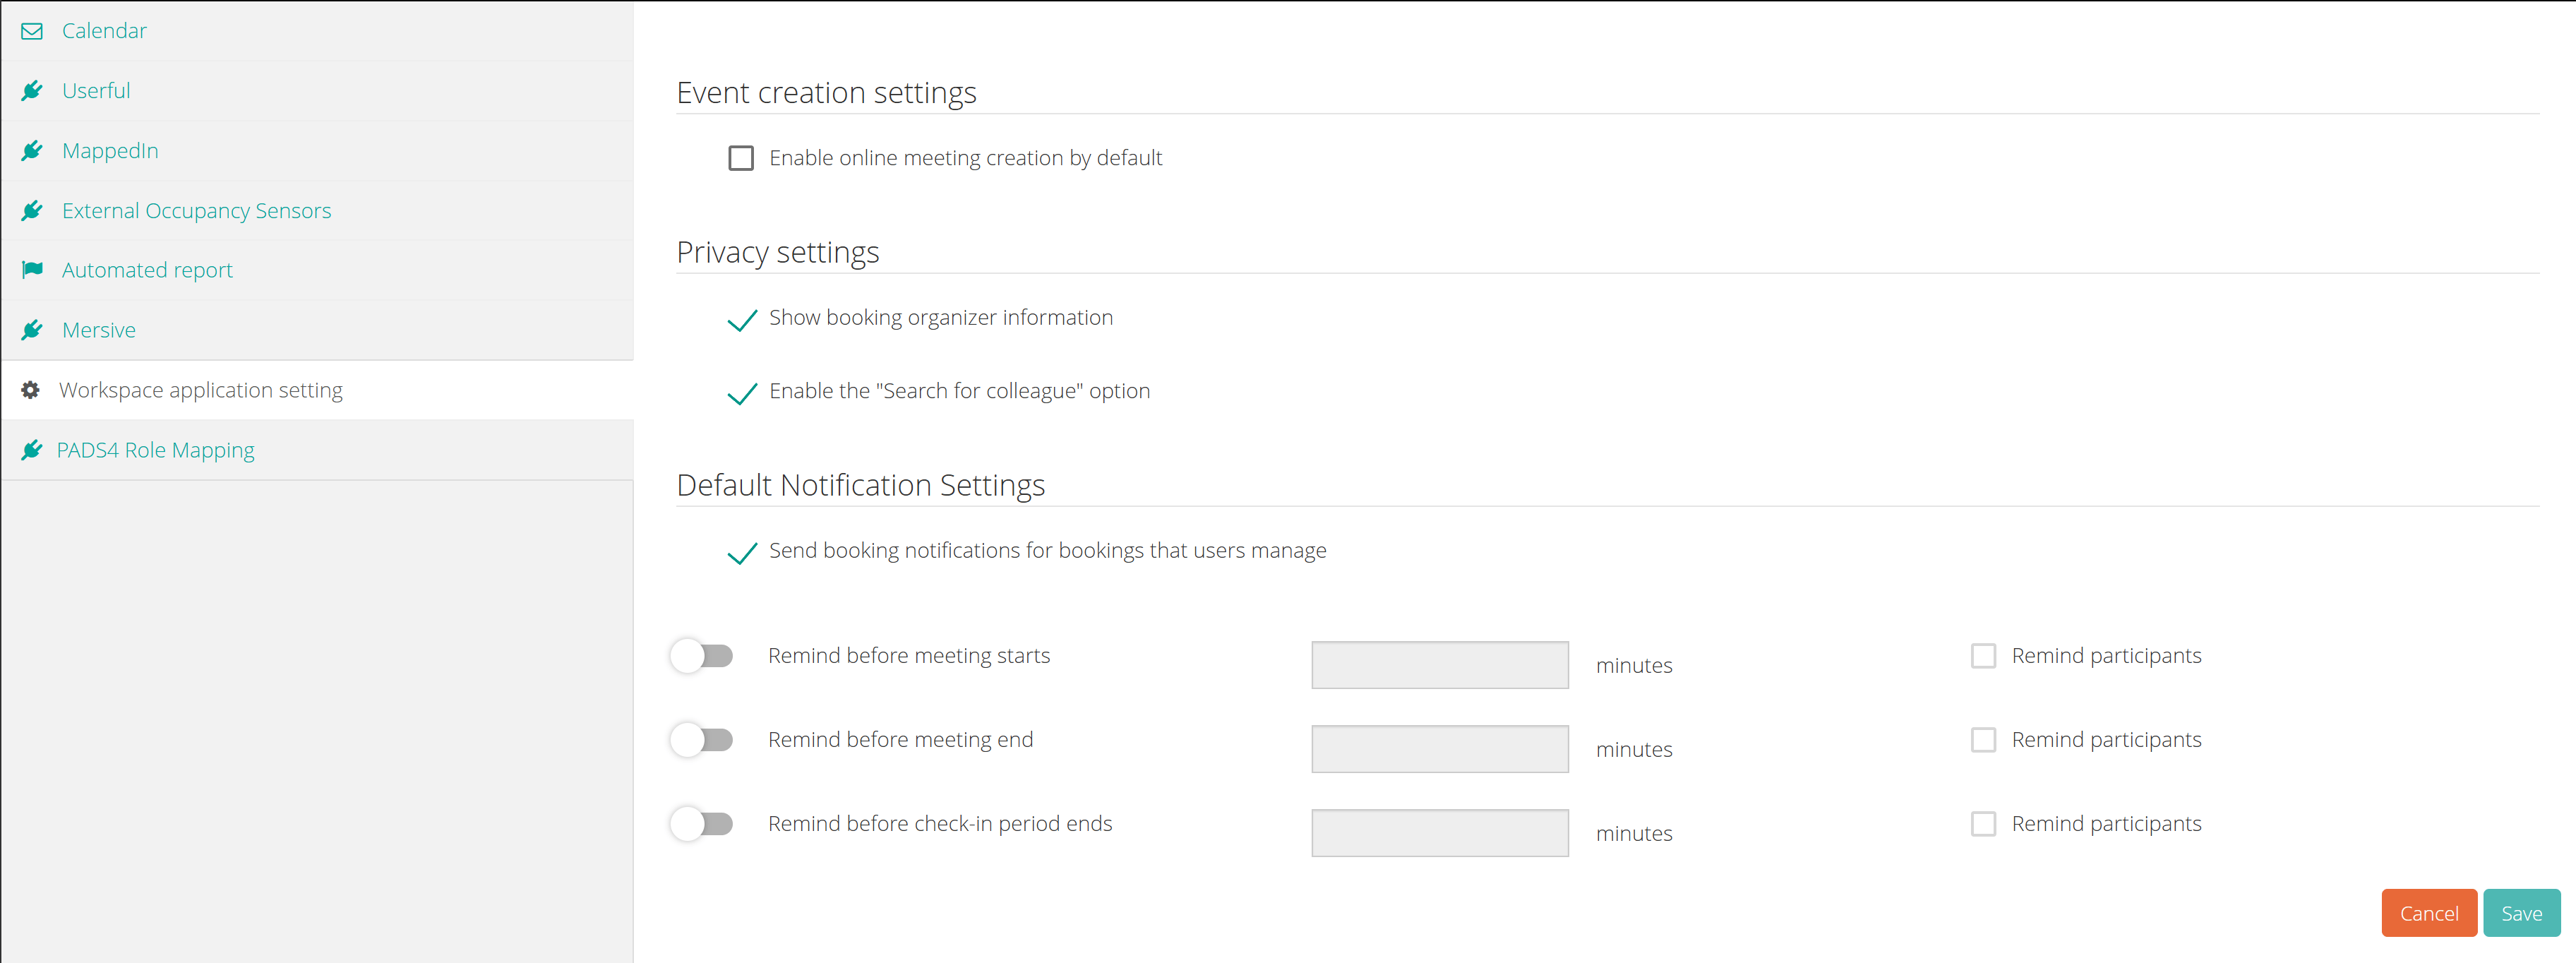
**Allow online meeting creation:** This option needs to be turned on to enable Microsoft Teams meeting support.
You can also define if the teams meeting option should be selected by default in workspace event creation if you set the following option:
* Go to CMS Administration
* Open the "Workspace application settings"
* Check "Enable online meeting creation by default"
* Click save
**Exchange Server:** [http://outlook.office365.com](http://outlook.office365.com) / example
**Application ID:** The application ID from Azure
**Tenant ID:** The directory tenant ID from Azure
**Client secret Key:** The client secret key from Azure.
**Default service account:** The default service account from Azure directory for retrieving the access.
**Impersonation:** Described below
**Room list address:** The SMTP URL of the room list that you have configured. This will allow you to import rooms in Workspace.
**Allow online meeting creation:** This option needs to be turned on to enable Microsoft Teams meeting support.
You can also define if the teams meeting option should be selected by default in workspace event creation if you set the following option:
* Go to CMS Administration
* Open the "Workspace application settings"
* Check "Enable online meeting creation by default"
* Click save
 ## Create event with teams meeting from workspace
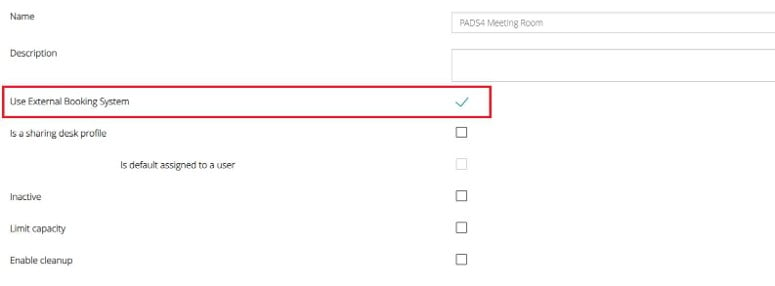
This option will only be available if you selected a room that is configured to use the external calendar configuration that has that option set up or also if your user is configured to use the external calendar configuration for user impersonation.
## Create event with teams meeting from workspace
This option will only be available if you selected a room that is configured to use the external calendar configuration that has that option set up or also if your user is configured to use the external calendar configuration for user impersonation.
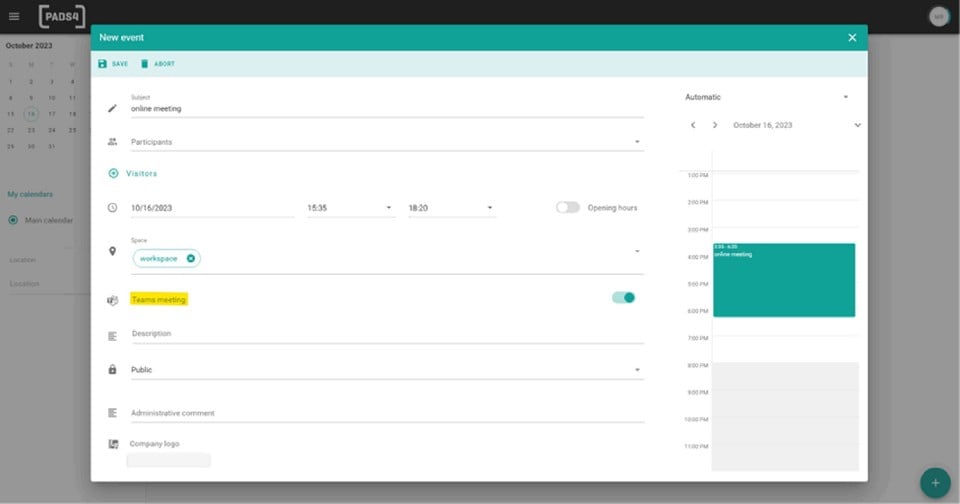
 * To create a teams meeting in workspace, just create a simple event in workspace and select the teams meeting option while creating the event.
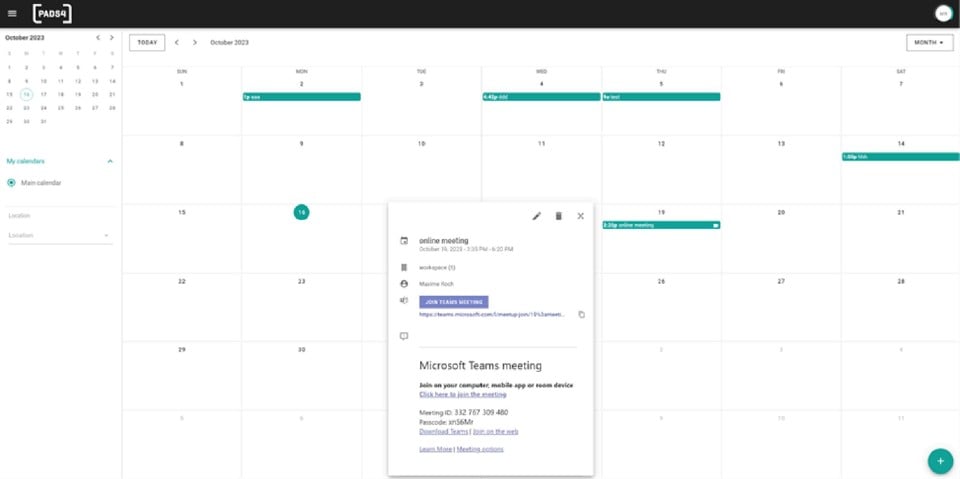
 * After making the event with the teams meeting option turned on, you will see it as shown below:
 # Impersonation
There are 3 operating modes described below, these operating modes are to be set according to the desired results and also according to the security rules of the company:
# Impersonation
There are 3 operating modes described below, these operating modes are to be set according to the desired results and also according to the security rules of the company:
 ## #1. Impersonation = Full access
Using this type of Full Access Impersonation, the reservation function will have the following behavior:
### Booking from Outlook
* The reservation will be made from the user account with the choice of the room and the guests.
* This reservation can be modified and deleted from Outlook and Workspace.
* Changing and deleting the tablet reservation will affect both the user and resource calendar.
### Booking from Workspace
* The reservation will be made from the user account with the choice of the room and the guests.
* This reservation can be modified and deleted from Workspace and Outlook.
* Changing and deleting the tablet reservation will affect both the user and resource calendar.
### Booking from a tablet
* The reservation will be made from the service account which will usurp the identity of the connected user.
* The owner / organizer of the meeting will be the logged in user.
* This reservation can be modified and deleted from the tablet and will affect the calendar of the user and the resource.
* Editing, deleting or adding participants can be done using the user calendar (who owns this meeting).
## #2. Impersonation = Resources only
This option requires that the service account has the right to impersonate all resources imported into PADS4 CMS. To manage this, you will have to grant the role "**ApplicationImpersonation**" to the user of the service account following this PowerShell script:
```text theme={null}
New-ManagementScope -Name "CrystalResourceMailboxes" -RecipientRestrictionFilter \{RecipientTypeDetails -eq "RoomMailbox"\}
New-ManagementRoleAssignment -name "CrystalResourceImpersonation" -Role ApplicationImpersonation -User "serviceAccount" -CustomRecipientWriteScope "CrystalResourceMailboxes"
```
Using this type of "Resources Only" impersonation, the reservation function will have the following behavior.
### Booking from Outlook
* The reservation will be made from the user account with the choice of the room and the guests.
* This reservation can be modified and deleted from Outlook and Workspace.
* Changing and deleting the tablet reservation will only affect the resource calendar.
### Booking from Workspace
* The reservation will be made from the user account with the choice of the room and the guests.
* This reservation can be modified and deleted from Workspace and Outlook.
* Changing and deleting the tablet reservation will only affect the resource calendar.
### Booking from a tablet
* The reservation will be made from the service account which will usurp the identity of the resource.
* The owner / organizer of the meeting will be the resource and the logged in user will be added as a participant.
* This reservation can be modified and deleted from the tablet and will affect the calendar of the user and the resource.
* Editing, deleting or adding participants can be done using the resource calendar (who owns this meeting).
## #3. Impersonation = None
Using this type of impersonation "None", the reservation function will have the following behavior:
### Booking from Outlook
* The reservation will be made from the user account with the choice of the room and the guests.
* This reservation can be changed and deleted from Outlook.
* Changing and deleting the tablet reservation will only affect the resource calendar.
## #1. Impersonation = Full access
Using this type of Full Access Impersonation, the reservation function will have the following behavior:
### Booking from Outlook
* The reservation will be made from the user account with the choice of the room and the guests.
* This reservation can be modified and deleted from Outlook and Workspace.
* Changing and deleting the tablet reservation will affect both the user and resource calendar.
### Booking from Workspace
* The reservation will be made from the user account with the choice of the room and the guests.
* This reservation can be modified and deleted from Workspace and Outlook.
* Changing and deleting the tablet reservation will affect both the user and resource calendar.
### Booking from a tablet
* The reservation will be made from the service account which will usurp the identity of the connected user.
* The owner / organizer of the meeting will be the logged in user.
* This reservation can be modified and deleted from the tablet and will affect the calendar of the user and the resource.
* Editing, deleting or adding participants can be done using the user calendar (who owns this meeting).
## #2. Impersonation = Resources only
This option requires that the service account has the right to impersonate all resources imported into PADS4 CMS. To manage this, you will have to grant the role "**ApplicationImpersonation**" to the user of the service account following this PowerShell script:
```text theme={null}
New-ManagementScope -Name "CrystalResourceMailboxes" -RecipientRestrictionFilter \{RecipientTypeDetails -eq "RoomMailbox"\}
New-ManagementRoleAssignment -name "CrystalResourceImpersonation" -Role ApplicationImpersonation -User "serviceAccount" -CustomRecipientWriteScope "CrystalResourceMailboxes"
```
Using this type of "Resources Only" impersonation, the reservation function will have the following behavior.
### Booking from Outlook
* The reservation will be made from the user account with the choice of the room and the guests.
* This reservation can be modified and deleted from Outlook and Workspace.
* Changing and deleting the tablet reservation will only affect the resource calendar.
### Booking from Workspace
* The reservation will be made from the user account with the choice of the room and the guests.
* This reservation can be modified and deleted from Workspace and Outlook.
* Changing and deleting the tablet reservation will only affect the resource calendar.
### Booking from a tablet
* The reservation will be made from the service account which will usurp the identity of the resource.
* The owner / organizer of the meeting will be the resource and the logged in user will be added as a participant.
* This reservation can be modified and deleted from the tablet and will affect the calendar of the user and the resource.
* Editing, deleting or adding participants can be done using the resource calendar (who owns this meeting).
## #3. Impersonation = None
Using this type of impersonation "None", the reservation function will have the following behavior:
### Booking from Outlook
* The reservation will be made from the user account with the choice of the room and the guests.
* This reservation can be changed and deleted from Outlook.
* Changing and deleting the tablet reservation will only affect the resource calendar.