> ## Documentation Index
> Fetch the complete documentation index at: https://docs.pads4.com/llms.txt
> Use this file to discover all available pages before exploring further.
# How to configure Single Sign On Azure for PADS4
The below process helps you configure your PADS4 CMS installation touse Azure SSO.
From PADS4 2025.2 onward, this feature is part of PADS4 CTRL Center. For more information, see CTRL Center > Administration > Identity.
## Azure settings
It is necessary to configure the Azure instance to allow users within yourorganization to access the PADS4 (Legacy) CMS application. To enable this, please follow the steps in this document :
## Step 1 : Navigate and login to your "Azure portal" page as an admin
[https://portal.azure.com/](https://portal.azure.com/)
## Step 2 : Select the "Microsoft Entra ID" option
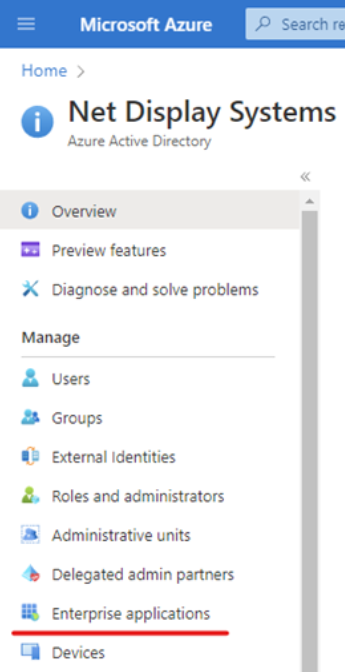
 ## Step 3 : On the left hand side panel, select "Enterprise Applications"
 # **Important**
If you \*\*don't \*\* want to use an Application Proxy onyour on-premise application then continue on step 4 below and skip steps 7 and 8.
If you \*\*do \*\*want to use an Application Proxy for your on-premise application then proceed to step 7 and skip steps 4, 5 and 6.
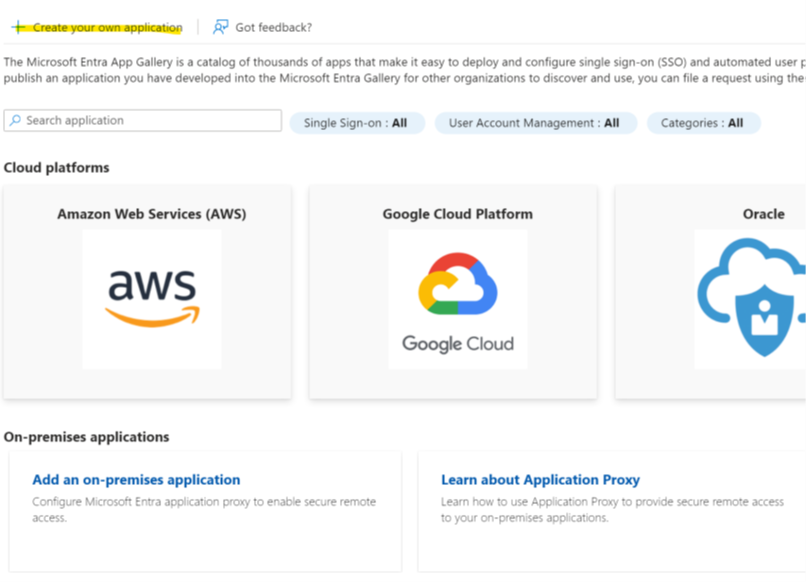
## Step 4 : Select the "+ New application" option at the top of the screen
# **Important**
If you \*\*don't \*\* want to use an Application Proxy onyour on-premise application then continue on step 4 below and skip steps 7 and 8.
If you \*\*do \*\*want to use an Application Proxy for your on-premise application then proceed to step 7 and skip steps 4, 5 and 6.
## Step 4 : Select the "+ New application" option at the top of the screen
 ## Step 5 : Click on "Create you own application"
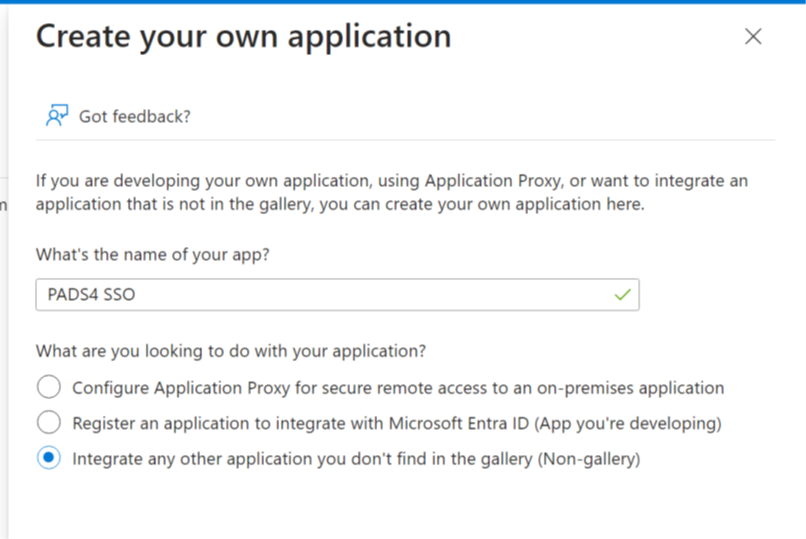
 ## Step 6 : Fill in the information requested in the form and click create
 Skip this step (7) if you don't use an Application Proxy.
## Step 7 : Creating a connector group / application proxy connector:
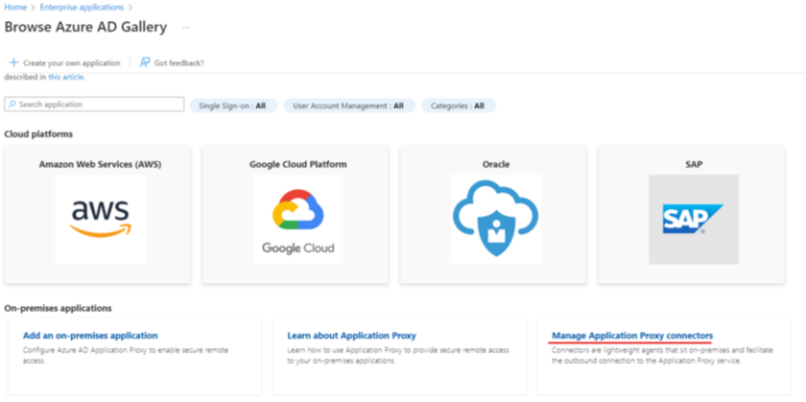
Select the **Manage Application Proxy Connectors** **section**
Skip this step (7) if you don't use an Application Proxy.
## Step 7 : Creating a connector group / application proxy connector:
Select the **Manage Application Proxy Connectors** **section**
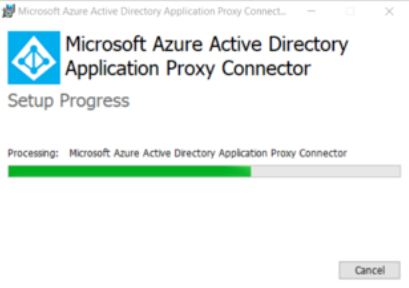
 1. In the Application Proxy menu, Select the + Download ConnectorService
2. Agree to the terms and download the **AADApplicationProxyConnectorInstaller.exe** file to the server PC.
3. Run the installer and make sure to validate your Azure Administratorcredentials during the setup.
1. In the Application Proxy menu, Select the + Download ConnectorService
2. Agree to the terms and download the **AADApplicationProxyConnectorInstaller.exe** file to the server PC.
3. Run the installer and make sure to validate your Azure Administratorcredentials during the setup.
 4. After the installation is complete, select the **+New Connector** Groupsection
5. Create a default name for your connection. For example : **SSO Connector**
6. Select your server machine from the Connector list
7. Select the region where your machine resides.
4. After the installation is complete, select the **+New Connector** Groupsection
5. Create a default name for your connection. For example : **SSO Connector**
6. Select your server machine from the Connector list
7. Select the region where your machine resides.
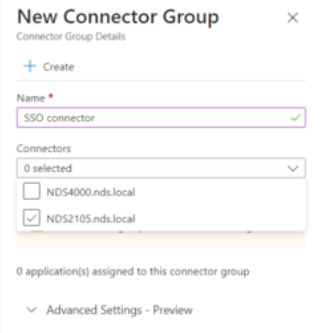 8. Save your new connection here.
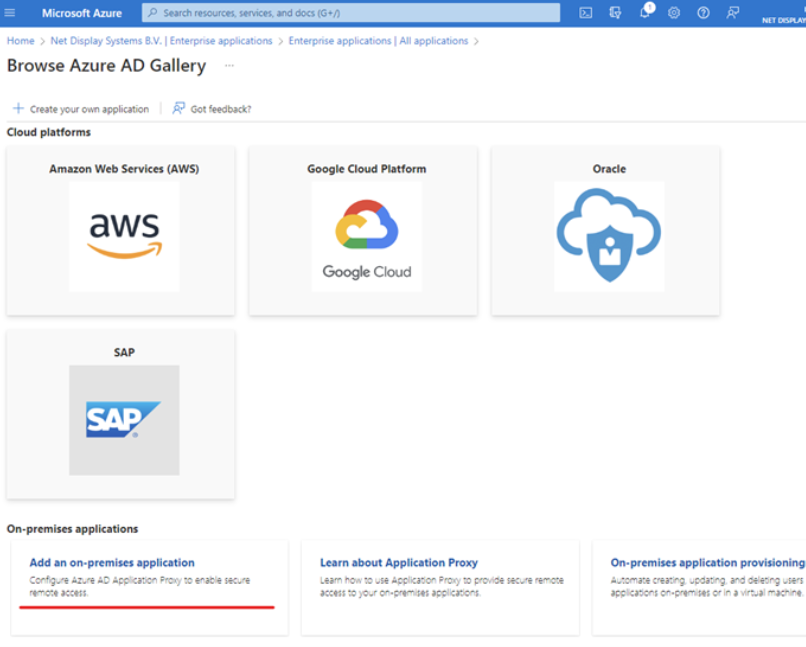
9. Head back to the Enterprise Applications section, and select the **"Add your own on-premises application"**
## Creating an on-premises application within Azure
1. Select **Add an on-premises application**
8. Save your new connection here.
9. Head back to the Enterprise Applications section, and select the **"Add your own on-premises application"**
## Creating an on-premises application within Azure
1. Select **Add an on-premises application**
 Skip this step (8) if you don't use an Application Proxy.
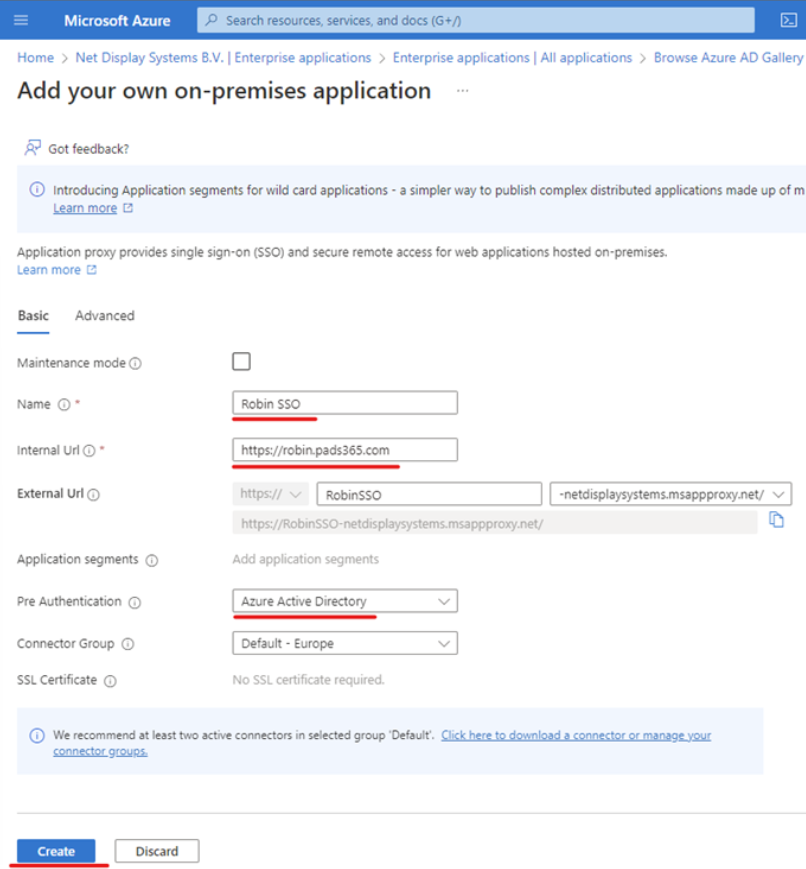
## Step 8 : Fill in the information requested in the formand click create.
Skip this step (8) if you don't use an Application Proxy.
## Step 8 : Fill in the information requested in the formand click create.
 ### Example :
Name : PADS4 CMS
Internal URL : URL of the PADS4 CMS installation ([https://servername](https://servername))
Pre-authentication : Azure Active Directory
Connector Group : SSO Connector (default). This is the connector group you have just set up
Then Click on the add button
## Step 9 : Navigate to the newly created application
1. Navigate to the newly created application by selecting **“ Enterprise Applications"** and use t**he search bar** to find your application. **Select it** and then navigate to "Users and Groups" :
### Example :
Name : PADS4 CMS
Internal URL : URL of the PADS4 CMS installation ([https://servername](https://servername))
Pre-authentication : Azure Active Directory
Connector Group : SSO Connector (default). This is the connector group you have just set up
Then Click on the add button
## Step 9 : Navigate to the newly created application
1. Navigate to the newly created application by selecting **“ Enterprise Applications"** and use t**he search bar** to find your application. **Select it** and then navigate to "Users and Groups" :
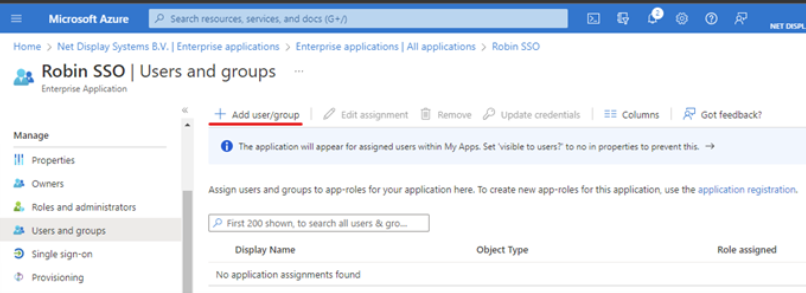
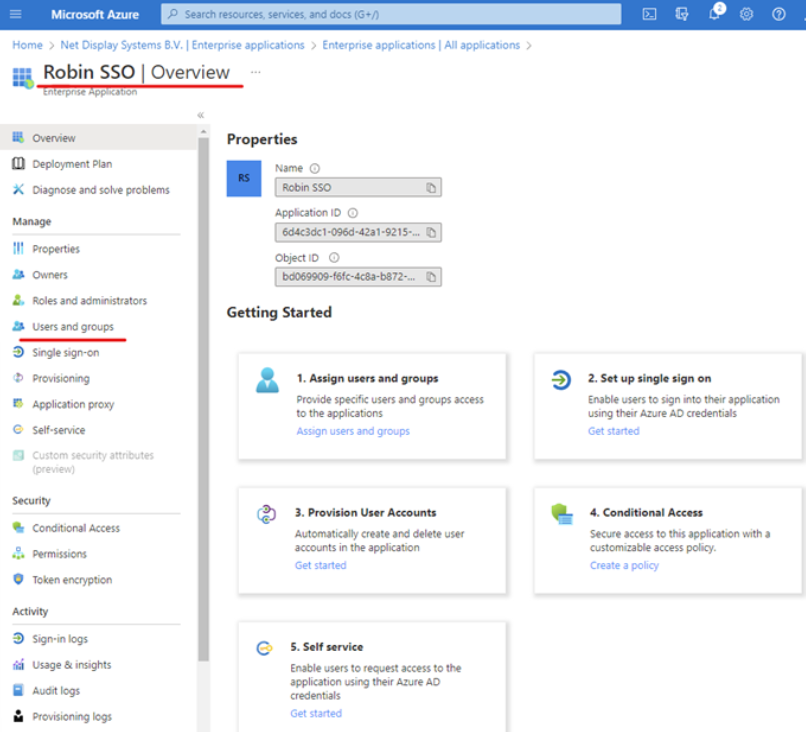 2. Add the users and groups that will have access to the application byselecting the **“ Add user/group ”** option
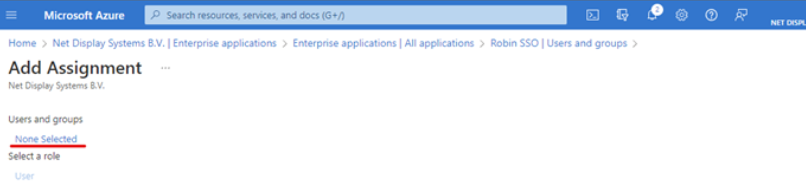
 3. Select **“None Selected”** option to gain access to the groups and users :
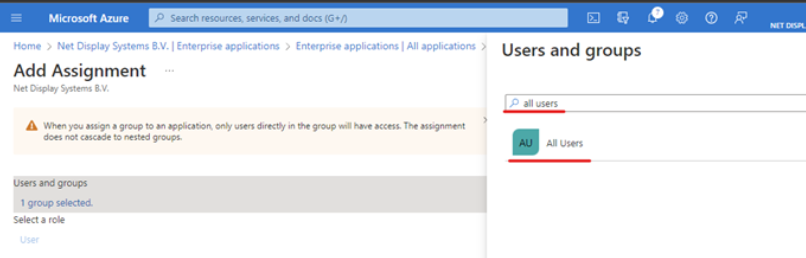
 4. Use the search bar to search for a user or group. Click **"select"** and **"assign"** upon completion
 It is highly recommended to create a PADS4 CMS user group withthe Windows Server AD as the source.
## Step 10 : To configure Single Sign On (SSO)
Select **"Single sign-on option"** in the left pane and then **"SAML"**
It is highly recommended to create a PADS4 CMS user group withthe Windows Server AD as the source.
## Step 10 : To configure Single Sign On (SSO)
Select **"Single sign-on option"** in the left pane and then **"SAML"**
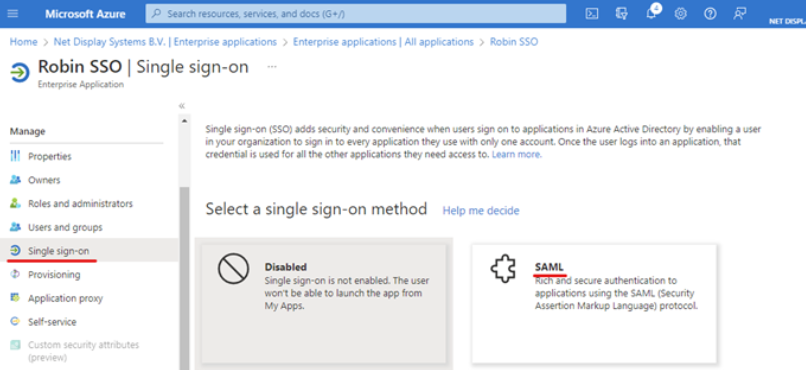 ## Step 11 : Select "Edit" on the "Basic SAMLConfiguration"
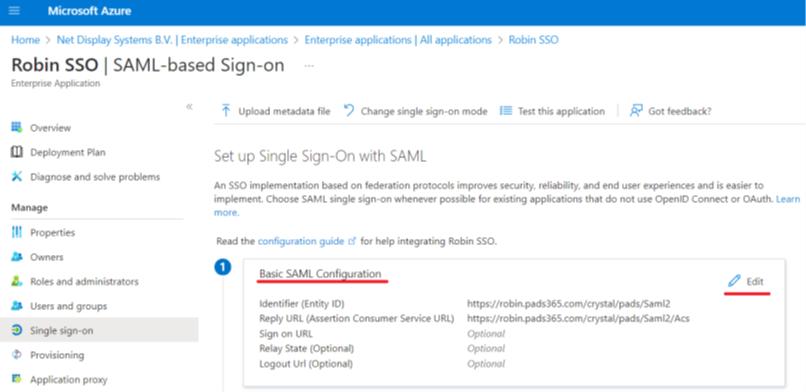 Select “ Add identifier ” and **" Add Reply URL ”** as provide the value per the below example:
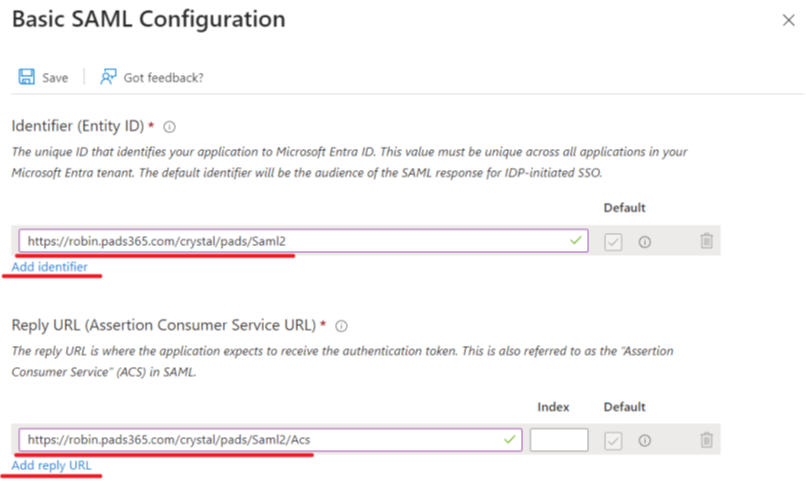 ## Example :
**Identifier**: Local PADS4 CMS URL with /Saml2 **(e.g:** [https://robin.pads365.com/crystal/domain/Saml2](https://robin.pads365.com/crystal/domain/Saml2))
If a unique network port is being utilized, be sure to include this in above string.
E.g : [https://robin.pads365.com:444/crystal/domain/Saml2](https://robin.pads365.com:444/crystal/domain/Saml2)
**Make sure** you specify your PADS4 domain at "domain" in theURL
## Example :
**Identifier**: Local PADS4 CMS URL with /Saml2 **(e.g:** [https://robin.pads365.com/crystal/domain/Saml2](https://robin.pads365.com/crystal/domain/Saml2))
If a unique network port is being utilized, be sure to include this in above string.
E.g : [https://robin.pads365.com:444/crystal/domain/Saml2](https://robin.pads365.com:444/crystal/domain/Saml2)
**Make sure** you specify your PADS4 domain at "domain" in theURL
 If you use the default domain name it will be : [https://robin.pads365.com/crystal/pads/Saml2](https://robin.pads365.com/crystal/pads/Saml2)
Reply URL : Local PADS4 CMS URL with /Saml2/Acs **(e.g:**[**https://robin.pads365.com/crystal/domain/Saml2/Acs**](https://robin.pads365.com/crystal/domain/Saml2/Acs) )
If a unique network port is being utilized, be sure to include this in above string.
E.g [https://robin.pads365.com:444/crystal/domain/Saml2/Acs](https://robin.pads365.com:444/crystal/domain/Saml2/Acs)
**Make sure** you specify your PADS4 domain at "domain" in theURL
If you use the default domain name it will be : [https://robin.pads365.com/crystal/pads/Saml2](https://robin.pads365.com/crystal/pads/Saml2)
Reply URL : Local PADS4 CMS URL with /Saml2/Acs **(e.g:**[**https://robin.pads365.com/crystal/domain/Saml2/Acs**](https://robin.pads365.com/crystal/domain/Saml2/Acs) )
If a unique network port is being utilized, be sure to include this in above string.
E.g [https://robin.pads365.com:444/crystal/domain/Saml2/Acs](https://robin.pads365.com:444/crystal/domain/Saml2/Acs)
**Make sure** you specify your PADS4 domain at "domain" in theURL
 If you use the default domain name it will be:
[https://robin.pads365.com/crystal/pads/Saml2/Acs](https://robin.pads365.com/crystal/pads/Saml2/Acs)
**Remark :** If you have configured SSO on a version before 2023.1, the domain name wasn't required in the URL when using only one domain. From version 2023.1 onwards, the domain name is required in the URL both for one and multi-domain setups.
Therefore, when updating from a version before 2023.1 with SSO configured, to the latest release, make sure to add the domain to both the Identifier and Reply URL.
**Be sure to "Save" these configurations.**
## Step 12 : Whilst in the “ Single sign-on ” menu, select “Edit ” on the “ Attributes & Claims ” section.
If you use the default domain name it will be:
[https://robin.pads365.com/crystal/pads/Saml2/Acs](https://robin.pads365.com/crystal/pads/Saml2/Acs)
**Remark :** If you have configured SSO on a version before 2023.1, the domain name wasn't required in the URL when using only one domain. From version 2023.1 onwards, the domain name is required in the URL both for one and multi-domain setups.
Therefore, when updating from a version before 2023.1 with SSO configured, to the latest release, make sure to add the domain to both the Identifier and Reply URL.
**Be sure to "Save" these configurations.**
## Step 12 : Whilst in the “ Single sign-on ” menu, select “Edit ” on the “ Attributes & Claims ” section.
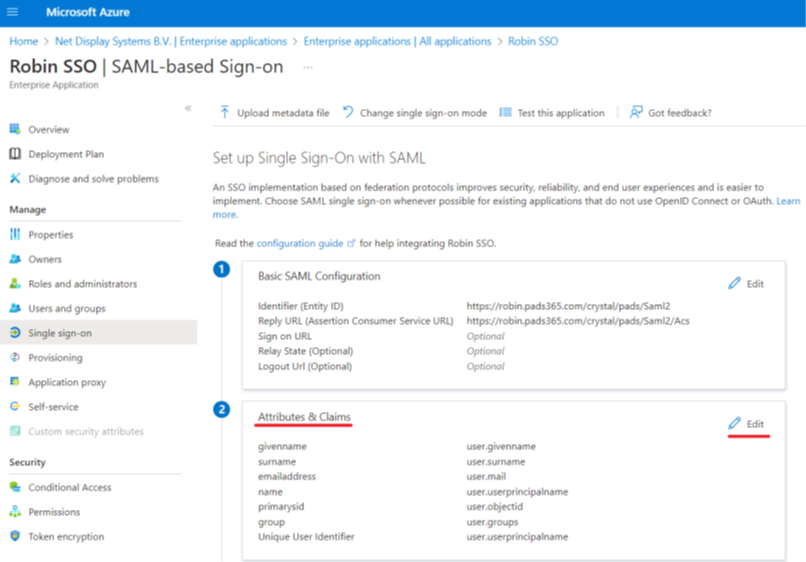 **By default, you would have a list of claims already, however, it isrequired that the claims matches the below example for successful authentication :**
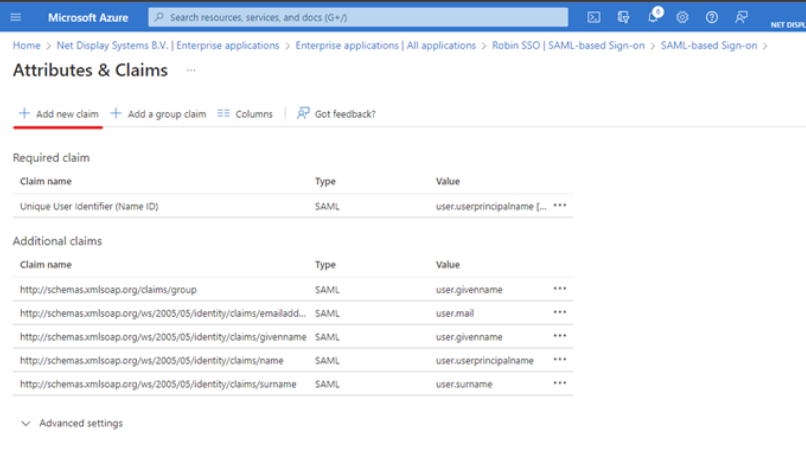
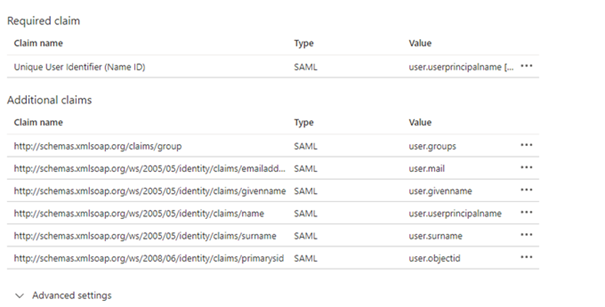 Add the primarysid claim : Select “Add new claim”
 **As per the example provided above, add a new claim to match the example table :**
Name : **primarysid**
Namespace : [**http://schemas.xmlsoap.org/ws/2008/06/identity/claims**](http://schemas.xmlsoap.org/ws/2008/06/identity/claims)
Source attribute : **user.objectid**
**Save all configurations.**
## Add / Edit the "group" claim detail as per below example and save
**As per the example provided above, add a new claim to match the example table :**
Name : **primarysid**
Namespace : [**http://schemas.xmlsoap.org/ws/2008/06/identity/claims**](http://schemas.xmlsoap.org/ws/2008/06/identity/claims)
Source attribute : **user.objectid**
**Save all configurations.**
## Add / Edit the "group" claim detail as per below example and save
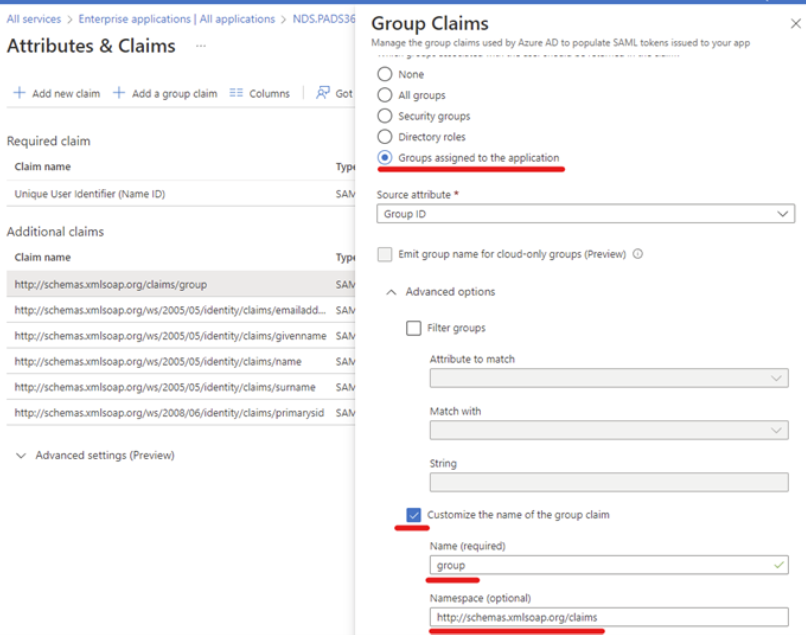 Name : **group**
Namespace : [http://schemas.xmlsoap.org/claims](http://schemas.xmlsoap.org/claims)
Remark : If you now experience the following behavior, the SSObutton on the login page works and you are able to input yourcredentials but it will get redirected to the PADS4 Login portal with "Noaccount is defined for your authentication request" in the URL.
**There can be 2 causes**
the group claim is incorrectly configured
The user you are trying to log in with has the same email addressalready configured to a CMS / Workspace user.
Name : **group**
Namespace : [http://schemas.xmlsoap.org/claims](http://schemas.xmlsoap.org/claims)
Remark : If you now experience the following behavior, the SSObutton on the login page works and you are able to input yourcredentials but it will get redirected to the PADS4 Login portal with "Noaccount is defined for your authentication request" in the URL.
**There can be 2 causes**
the group claim is incorrectly configured
The user you are trying to log in with has the same email addressalready configured to a CMS / Workspace user.
 You **have now prepared SSO within Azure for your PADS4Application.**
# Information Required for SSOConfiguration in PADS4 CMS
## In order to configure SSO within PADS4 CMS,you will require the following :
Certificate of the federation server
Federation Service Identifier
SAML SSO URL
Metadata URL
URL of the Relying party and;
Group ID of the User Group you have assigned to the application.
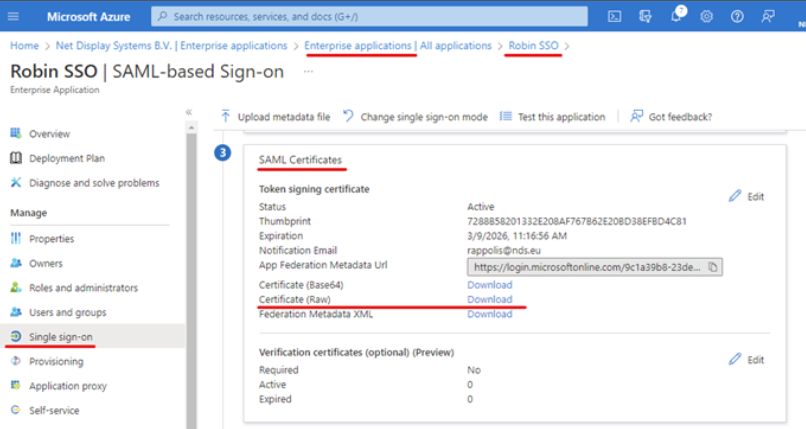
## 1. Obtaining the “Certificate of the federationserver”
Within your application, select **“ Single sign-on ”** in the left pane
Scroll down to the **“ SAML Certificates ”** heading
Select the **“ Download ”** option next to the “ Certificate (Raw) ” option.
You **have now prepared SSO within Azure for your PADS4Application.**
# Information Required for SSOConfiguration in PADS4 CMS
## In order to configure SSO within PADS4 CMS,you will require the following :
Certificate of the federation server
Federation Service Identifier
SAML SSO URL
Metadata URL
URL of the Relying party and;
Group ID of the User Group you have assigned to the application.
## 1. Obtaining the “Certificate of the federationserver”
Within your application, select **“ Single sign-on ”** in the left pane
Scroll down to the **“ SAML Certificates ”** heading
Select the **“ Download ”** option next to the “ Certificate (Raw) ” option.
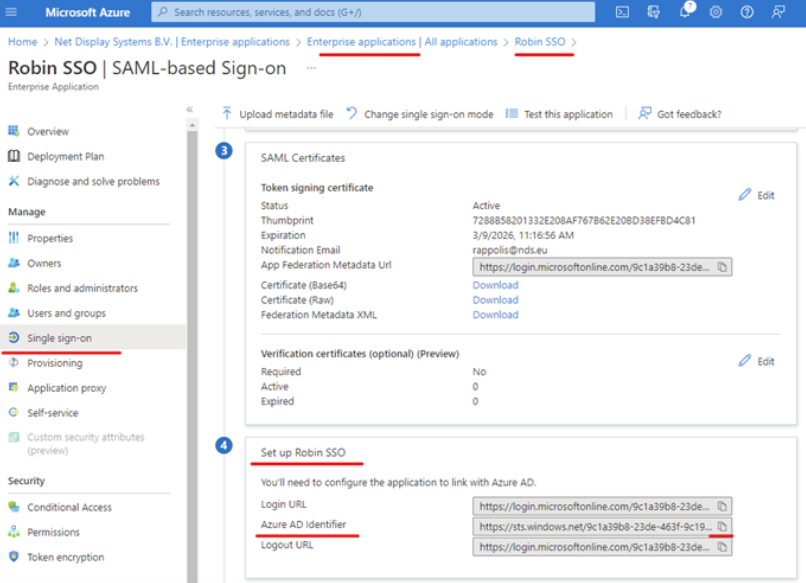
 ## 2. Obtaining the “ Federation Service Identifier ”
Within your application, select **“ Single sign-on ”** in the left pane
Scroll down to the **“Set up“ your\_application\_name ”** heading
Select the **“ Copy ”** option next to the **“ Azure AD Identifier ”** option.
## 2. Obtaining the “ Federation Service Identifier ”
Within your application, select **“ Single sign-on ”** in the left pane
Scroll down to the **“Set up“ your\_application\_name ”** heading
Select the **“ Copy ”** option next to the **“ Azure AD Identifier ”** option.
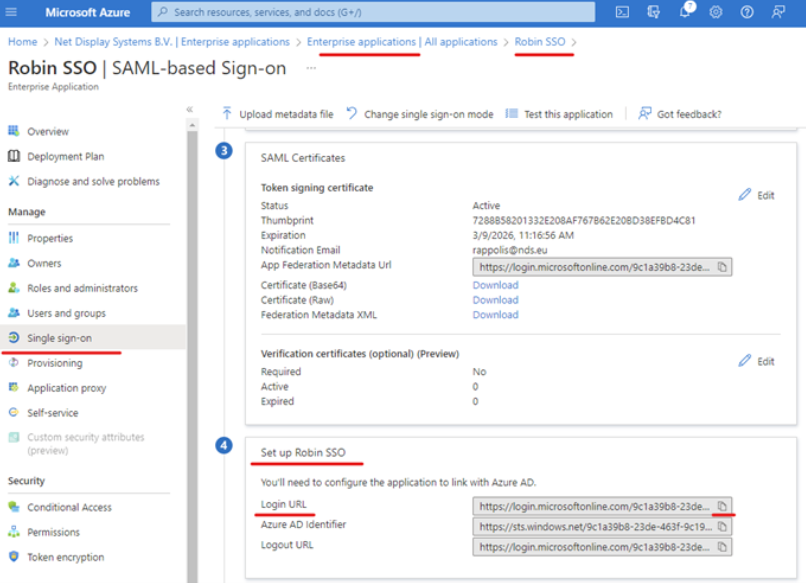
 ## 3. Obtaining the “SAML SSO URL"
Within your application, select **“ Single sign-on ”** in the left pane
Scroll down to the **“ Set up “your\_application\_name ”** heading
Select the\*\*“ Copy ”\*\* option next to the **“ Login URL ”** option.
## 3. Obtaining the “SAML SSO URL"
Within your application, select **“ Single sign-on ”** in the left pane
Scroll down to the **“ Set up “your\_application\_name ”** heading
Select the\*\*“ Copy ”\*\* option next to the **“ Login URL ”** option.
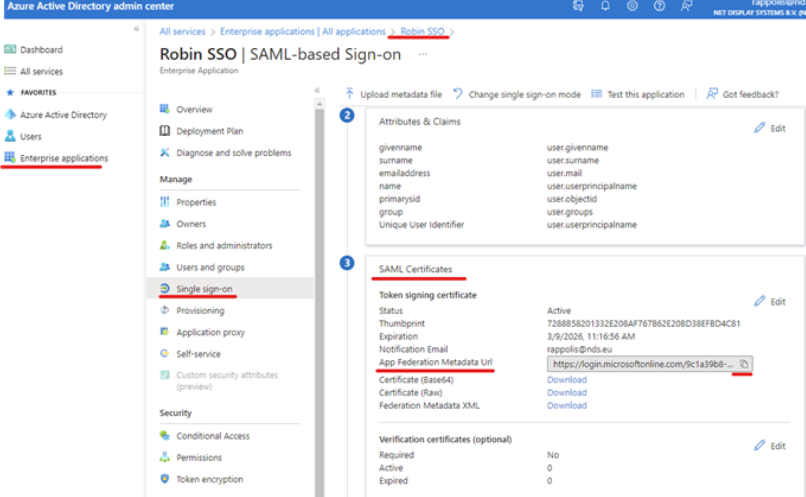
 ## 4. Obtaining the “Metadata URL"
Within your application, select “**Single sign-on ”** in the left pane
Scroll down to the \*\*“ SAML Certificates ” \*\*heading
Select the **“ Copy ”** option next to the **“ App FederationMetadata URL ”** option.
## 4. Obtaining the “Metadata URL"
Within your application, select “**Single sign-on ”** in the left pane
Scroll down to the \*\*“ SAML Certificates ” \*\*heading
Select the **“ Copy ”** option next to the **“ App FederationMetadata URL ”** option.
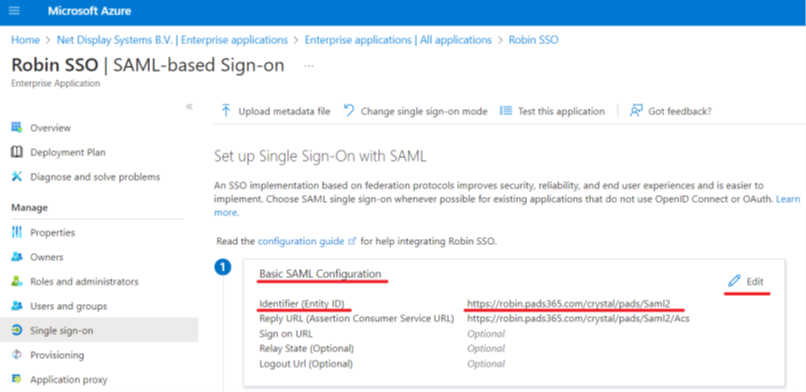
 ## 5. Obtaining the “URL of the Relying party”
Within your application, select **“ Single sign-on ”** in the left pane
Scroll to the **“ Basic SAML Configuration ”** heading
Copy the string next to the \*\*“ Identifier (Entity ID) ” \*\*option.
## 5. Obtaining the “URL of the Relying party”
Within your application, select **“ Single sign-on ”** in the left pane
Scroll to the **“ Basic SAML Configuration ”** heading
Copy the string next to the \*\*“ Identifier (Entity ID) ” \*\*option.
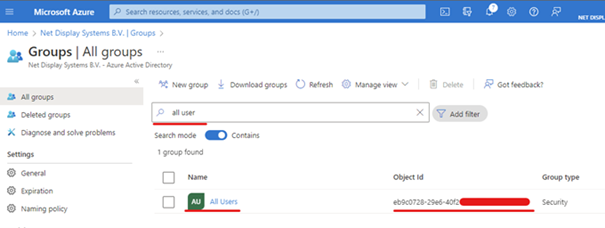
 ## 6. Obtaining the “Group ID” of the group you assigned to your application:
For **every user group added to utilize the PADS4 CMS application, a mapping table will be required to add the groups to the interface. Please provide the installers the Group ID’s and names of the Groups from Azure to ensure users will be able to login.**
Select **“home”** in portal.azure.com and select **“Microsoft Entra ID”**
Navigating to **“Groups”** in the left pane
Search for the group you assigned within your application and copy the\*\*“Object Id”\*\*
## 6. Obtaining the “Group ID” of the group you assigned to your application:
For **every user group added to utilize the PADS4 CMS application, a mapping table will be required to add the groups to the interface. Please provide the installers the Group ID’s and names of the Groups from Azure to ensure users will be able to login.**
Select **“home”** in portal.azure.com and select **“Microsoft Entra ID”**
Navigating to **“Groups”** in the left pane
Search for the group you assigned within your application and copy the\*\*“Object Id”\*\*
 ## 7. Now that all of the above information has been gathered, PADS4 CMS can now be configured to make use of SSO.