> ## Documentation Index
> Fetch the complete documentation index at: https://docs.pads4.com/llms.txt
> Use this file to discover all available pages before exploring further.
# How to configure the CMS SSO Plugin
Ce manuel ne peut être suivi que si vous avez configuré SSO dans votre environnement Azure / Entra ID. Vous pouvez suivre cet article pour le faire : **Single Sign On (Azure)**
Maintenant que toutes les informations ci-dessus ont été recueillies, PADS4 CMS peut être configuré pour utiliser SSO.
## Important :
Pour que SSO fonctionne correctement, PADS4 doit être configuré avec l'utilisation de HTTPS. Pour y parvenir, vous devez suivre ce guide en utilisant un certificat SSL.
## Étape 1 : Accédez à votre instance PADS4 CMS dans un navigateur
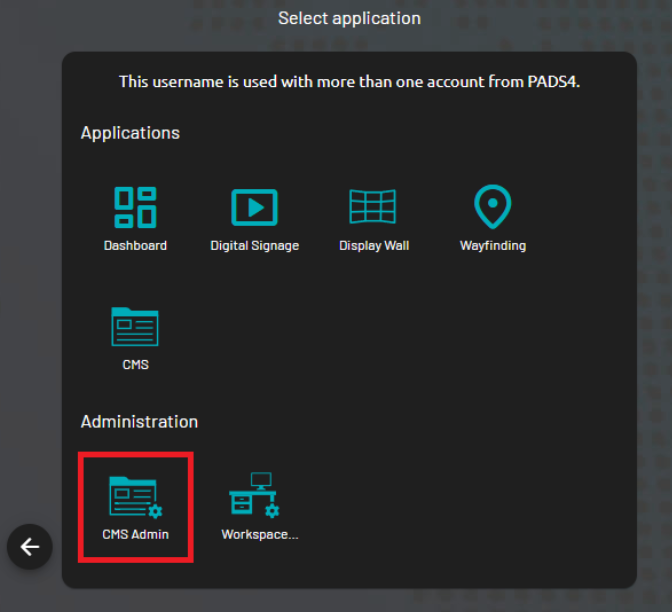
Connectez-vous avec un compte Administrateur et sélectionnez "CMS Admin"
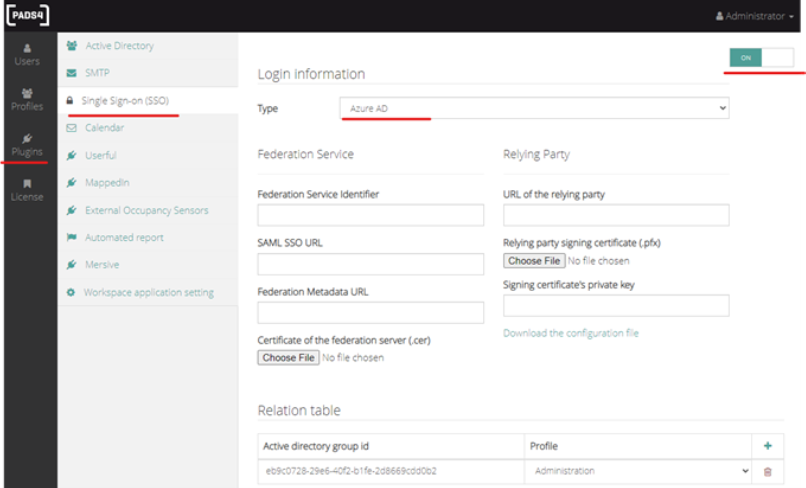
 ## Étape 2 : Sélectionnez "Plugins" dans le volet de gauche, puis "Single Sign-on (SSO)
Activez le plugin en haut à **droite**, à côté de **"Type"**, sélectionnez l'option **"Azure AD"** dans la liste déroulante
## Étape 2 : Sélectionnez "Plugins" dans le volet de gauche, puis "Single Sign-on (SSO)
Activez le plugin en haut à **droite**, à côté de **"Type"**, sélectionnez l'option **"Azure AD"** dans la liste déroulante
 ## Étape 3 : Insérez les informations obtenues dans la section précédente
| Connu dans Azure Active Directory | Connu dans PADS4 |
| --------------------------------- | ------------------------------------------- |
| Azure AD Identifier | Federation Service Identifier |
| URL of Relying Party | URL of Relying party |
| SMAL SSO URL | SAML SSO URL |
| App Federation Metadata | Federation Metada URL |
| Certificate (Raw) | Certificate of the federation server (.cer) |
| Object ID | Active directory group ID |
### Important :
La chaîne copiée pour **" URL of the relying party "** dans la configuration SSO du CMS ne doit pas contenir\*\*" /Saml "\*\* comme copié depuis Azure mais plutôt seulement\*\*" /crystal/pads "\*\* .
(Où "pads" est le domaine par défaut) Exemple : Le lien copié d'Azure ressemble à ceci :
[https://robin.pads365.com/crystal/pads/Saml2](https://robin.pads365.com/crystal/pads/Saml2)
cependant, il devrait plutôt être comme ceci
[https://robin.pads365.com/crystal/pads](https://robin.pads365.com/crystal/pads)
Téléchargez le certificat d'application (Raw) que vous avez téléchargé depuis Azure ici :
## Étape 4 : Téléchargez le certificat d'application (Raw) que vous avez téléchargé depuis Azure
## Étape 3 : Insérez les informations obtenues dans la section précédente
| Connu dans Azure Active Directory | Connu dans PADS4 |
| --------------------------------- | ------------------------------------------- |
| Azure AD Identifier | Federation Service Identifier |
| URL of Relying Party | URL of Relying party |
| SMAL SSO URL | SAML SSO URL |
| App Federation Metadata | Federation Metada URL |
| Certificate (Raw) | Certificate of the federation server (.cer) |
| Object ID | Active directory group ID |
### Important :
La chaîne copiée pour **" URL of the relying party "** dans la configuration SSO du CMS ne doit pas contenir\*\*" /Saml "\*\* comme copié depuis Azure mais plutôt seulement\*\*" /crystal/pads "\*\* .
(Où "pads" est le domaine par défaut) Exemple : Le lien copié d'Azure ressemble à ceci :
[https://robin.pads365.com/crystal/pads/Saml2](https://robin.pads365.com/crystal/pads/Saml2)
cependant, il devrait plutôt être comme ceci
[https://robin.pads365.com/crystal/pads](https://robin.pads365.com/crystal/pads)
Téléchargez le certificat d'application (Raw) que vous avez téléchargé depuis Azure ici :
## Étape 4 : Téléchargez le certificat d'application (Raw) que vous avez téléchargé depuis Azure
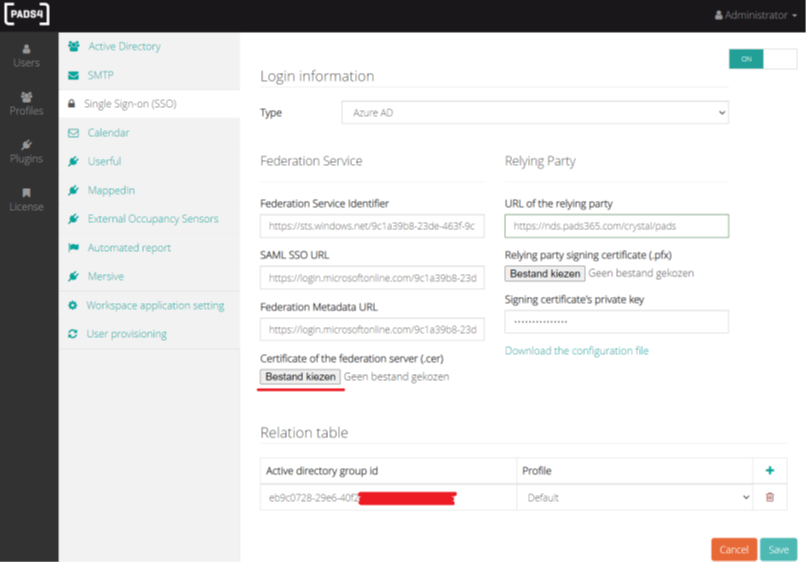
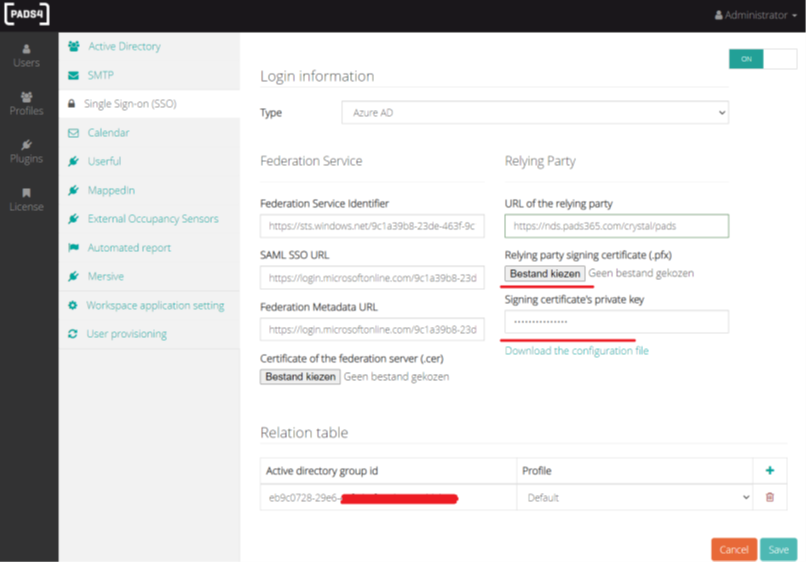
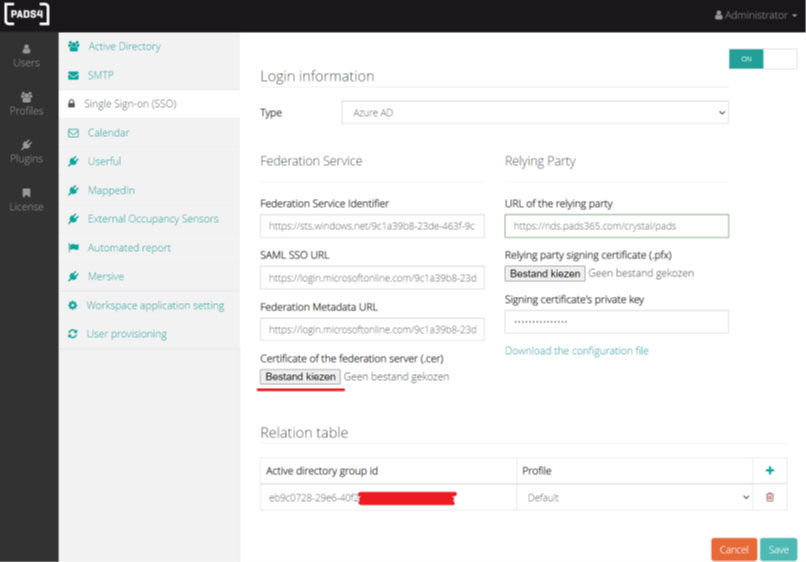 Pour le **"relying party signing certificate"**, nous vous suggérons d'utiliser le certificat que vous utilisez pour votre configuration HTTPS. "Convertissez ce certificat en .pfx. "
### La section ci-dessous est l'endroit où le certificat et la clé privée doivent être configurés.
Pour le **"relying party signing certificate"**, nous vous suggérons d'utiliser le certificat que vous utilisez pour votre configuration HTTPS. "Convertissez ce certificat en .pfx. "
### La section ci-dessous est l'endroit où le certificat et la clé privée doivent être configurés.
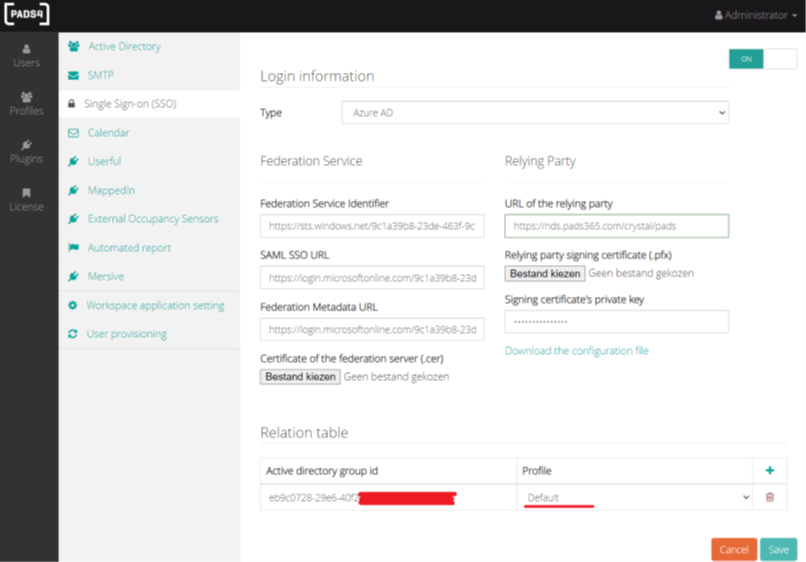
 Lorsque vous configurez la\*\*"Relation Table"\*\* dans CMS Admin pour SSO, définissez un profil que vous avez créé pour les utilisateurs ou groupes SSO en relation avec leur niveau de privilège.
Exemple ci-dessous :
Lorsque vous configurez la\*\*"Relation Table"\*\* dans CMS Admin pour SSO, définissez un profil que vous avez créé pour les utilisateurs ou groupes SSO en relation avec leur niveau de privilège.
Exemple ci-dessous :
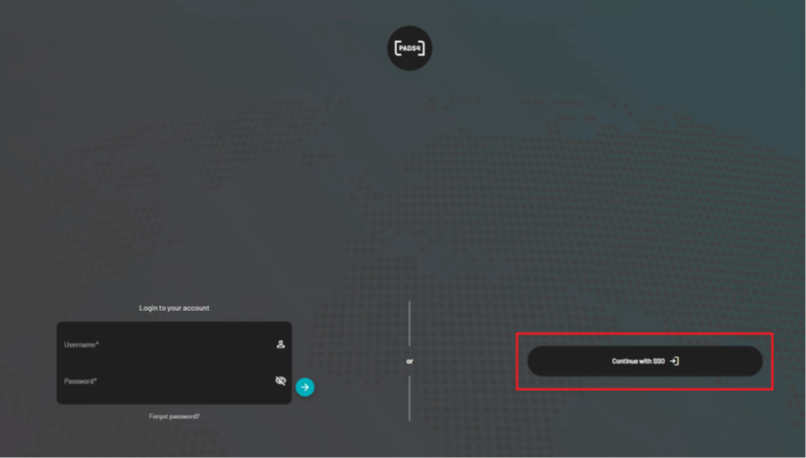
 Enregistrez la configuration, puis déconnectez-vous et vous devriez maintenant voir **"Single Sign On"** comme option :
 ## Notes importantes :
1. Lorsque votre certificat SSL expire, assurez-vous de télécharger le nouveau certificat et la clé privée dans cette section lors du renouvellement
## Notes importantes :
1. Lorsque votre certificat SSL expire, assurez-vous de télécharger le nouveau certificat et la clé privée dans cette section lors du renouvellement
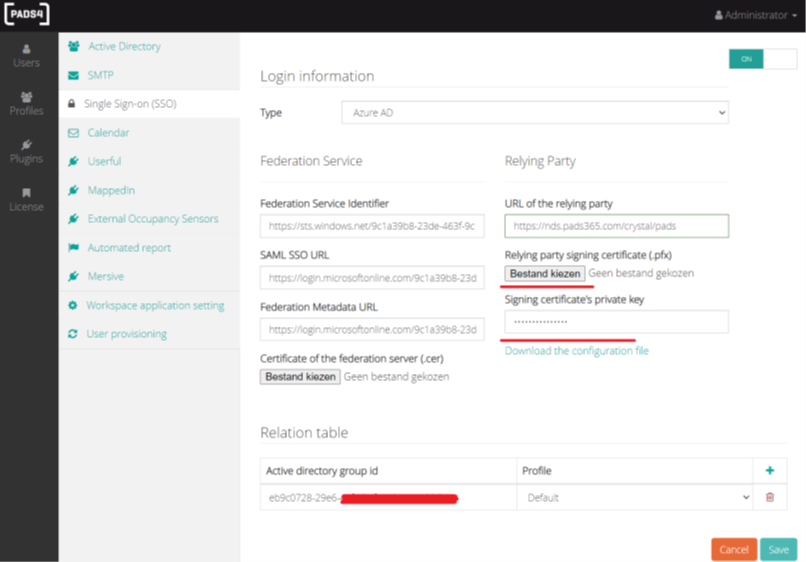 2. Lorsque votre certificat de fédération expire, assurez-vous de télécharger le nouveau certificat et la clé privée dans cette section lors du renouvellement