> ## Documentation Index
> Fetch the complete documentation index at: https://docs.pads4.com/llms.txt
> Use this file to discover all available pages before exploring further.
# Microsoft
This article requires you to have at least PADS4 version 2025.2.
This document provides step-by-step instructions for creating OAuth2 credentials for SMTP authentication using Google and Microsoft platforms. This document assumes the reader has basic familiarity with the Microsoft Azure Portal.
## **1. Register an application**
* Go to [https://portal.azure.com/](https://portal.azure.com/) and sign in with an account that has administrative privileges for Microsoft Entra ID
* In the left menu, select **App registrations**
* Configure the application:
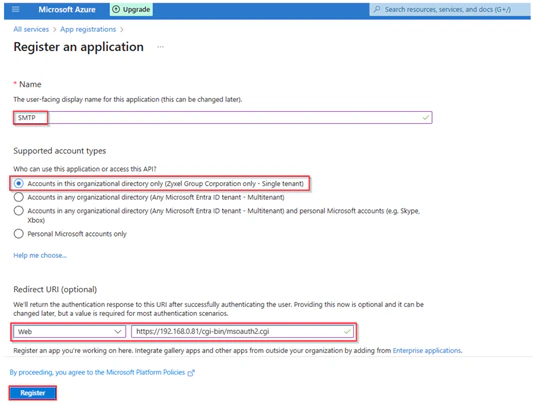 * Use the following information:
* **Name:** Enter a descriptive name ( e.g. Gateway SMTP App )
* **Supported account types:** Accounts in this organizational directory only
* **Redirect URI:** The redirect URI specifies where the autorization server should send the user back after successfully authenticating to return an access token to their email account.
* **Type**: Web
* **URL:** http\://\:\/credentials/generic/authorize/callback
* **Host**: DNS name or IP address of your PADS4 Web Portal
* **Port:** Optional, if your PADS4 instance does not use the default ports for HTTP or HTTPS.
* Once the information has been filled in, click on "**Register**".
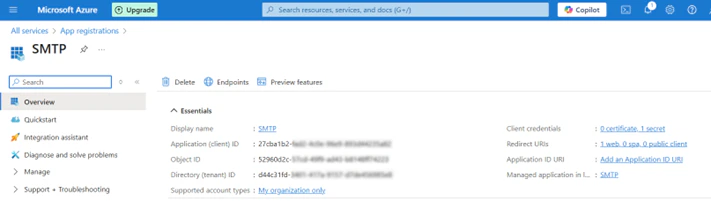
* Now on the app Overview page, copy the **Application(client) ID** and **Directory (tenant) ID**. These are required for your gateway configuration.
* Use the following information:
* **Name:** Enter a descriptive name ( e.g. Gateway SMTP App )
* **Supported account types:** Accounts in this organizational directory only
* **Redirect URI:** The redirect URI specifies where the autorization server should send the user back after successfully authenticating to return an access token to their email account.
* **Type**: Web
* **URL:** http\://\:\/credentials/generic/authorize/callback
* **Host**: DNS name or IP address of your PADS4 Web Portal
* **Port:** Optional, if your PADS4 instance does not use the default ports for HTTP or HTTPS.
* Once the information has been filled in, click on "**Register**".
* Now on the app Overview page, copy the **Application(client) ID** and **Directory (tenant) ID**. These are required for your gateway configuration.
 ## **2. Create client secret**
* Go to **Certificates & secrets** > **Client Secrets** > **New client secret**.
* Add a description (e.g., "SMTP Secret") and select an expiration period (e.g., 24 months).
* Click**Add** , **then immediately copy** the **value** of the client secret. **Note**: **This value is only shown once**, and you will not be able to retrieve it after leaving this page. If you lose it, you'll need to generate a new one. This is your “**ClientSecret**”.
* Store it securely, as it grants access to your application
## **3. Configure API Permissions**
* From the left-hand navigation of your application's overview page, click on **API permissions > +Add** a permission
* Select Microsoft Graph
## **2. Create client secret**
* Go to **Certificates & secrets** > **Client Secrets** > **New client secret**.
* Add a description (e.g., "SMTP Secret") and select an expiration period (e.g., 24 months).
* Click**Add** , **then immediately copy** the **value** of the client secret. **Note**: **This value is only shown once**, and you will not be able to retrieve it after leaving this page. If you lose it, you'll need to generate a new one. This is your “**ClientSecret**”.
* Store it securely, as it grants access to your application
## **3. Configure API Permissions**
* From the left-hand navigation of your application's overview page, click on **API permissions > +Add** a permission
* Select Microsoft Graph
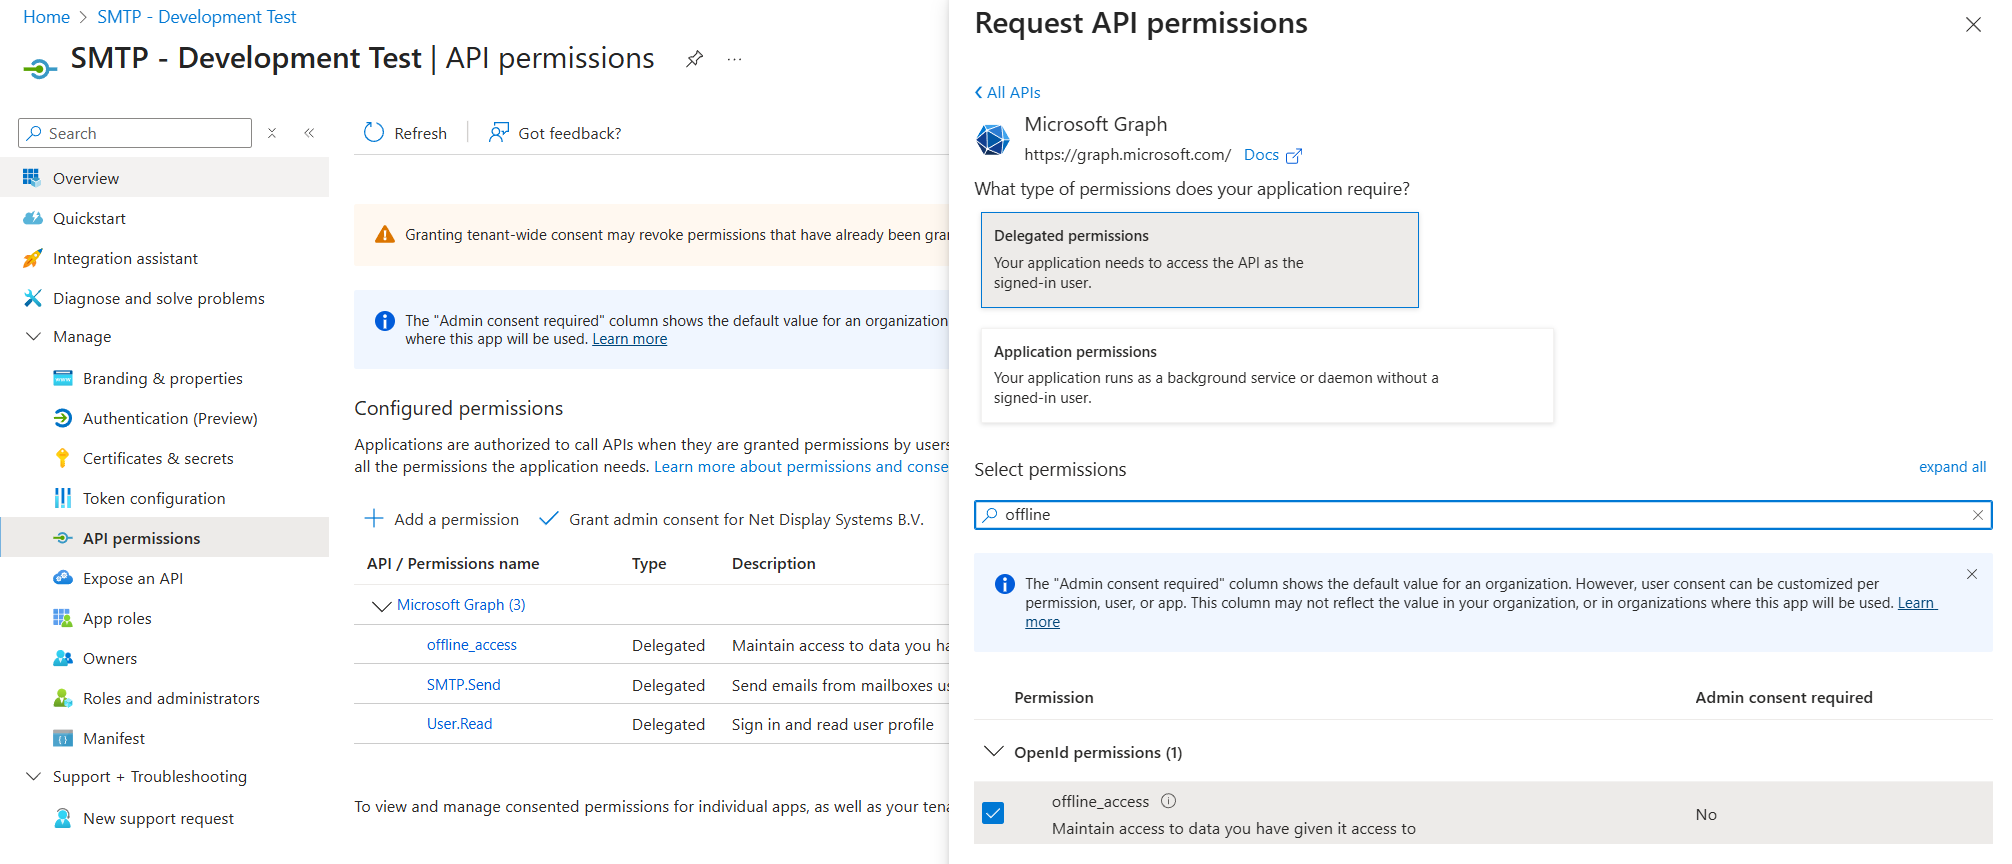
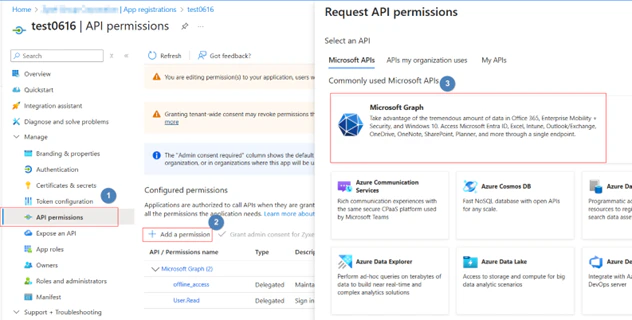 * Choose Delegated **permissions > Search** for offline access
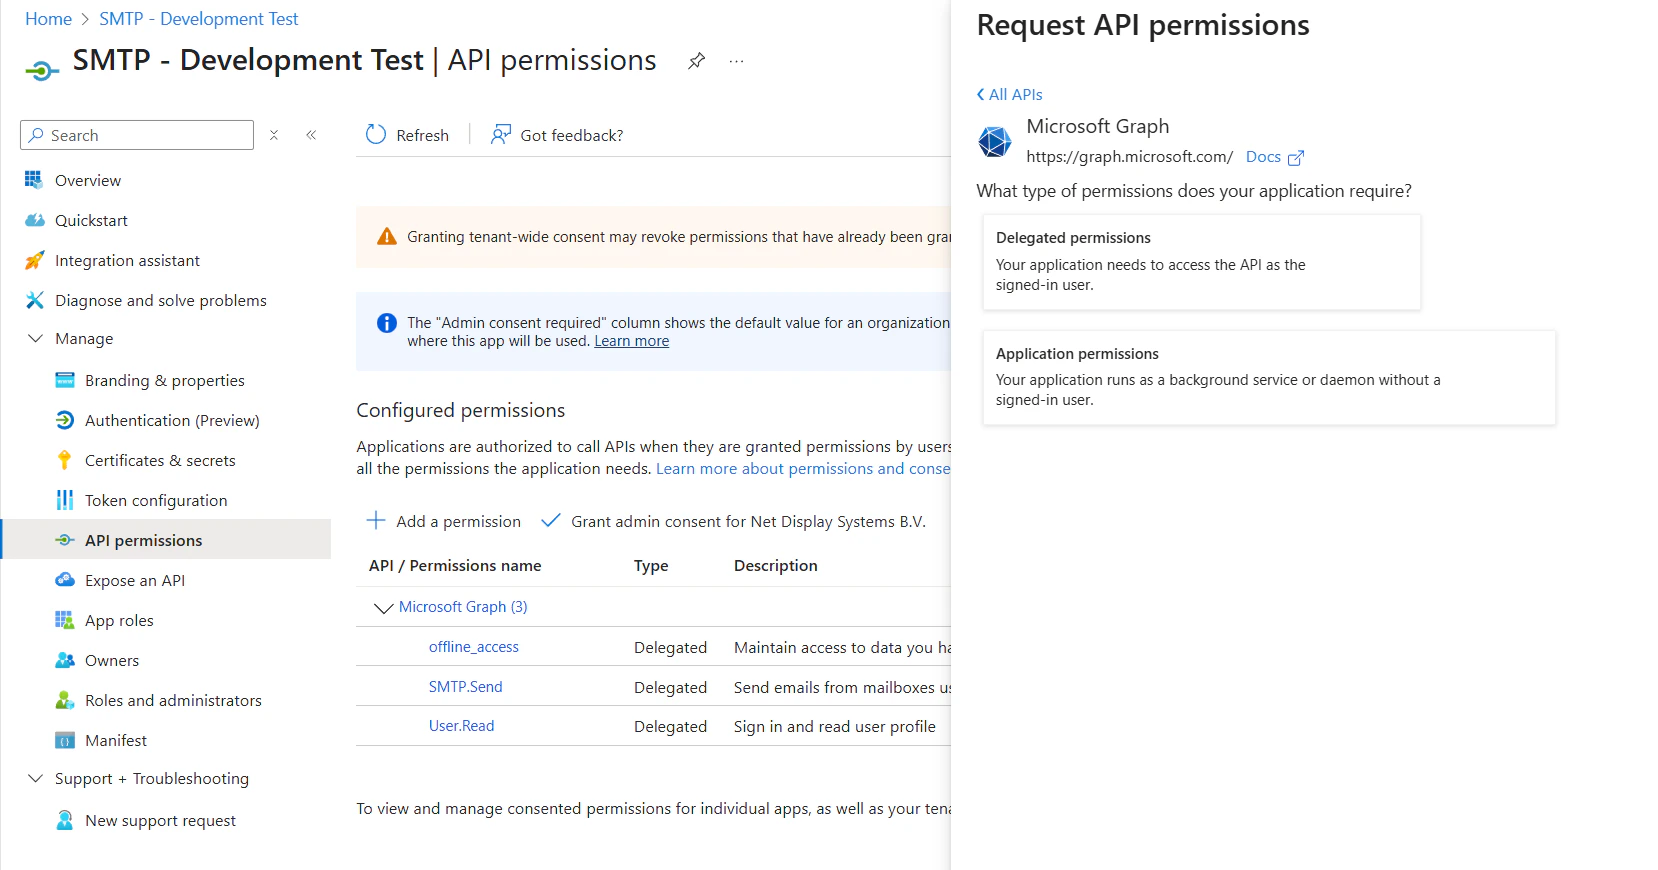 * Add **offline\_access** permission.
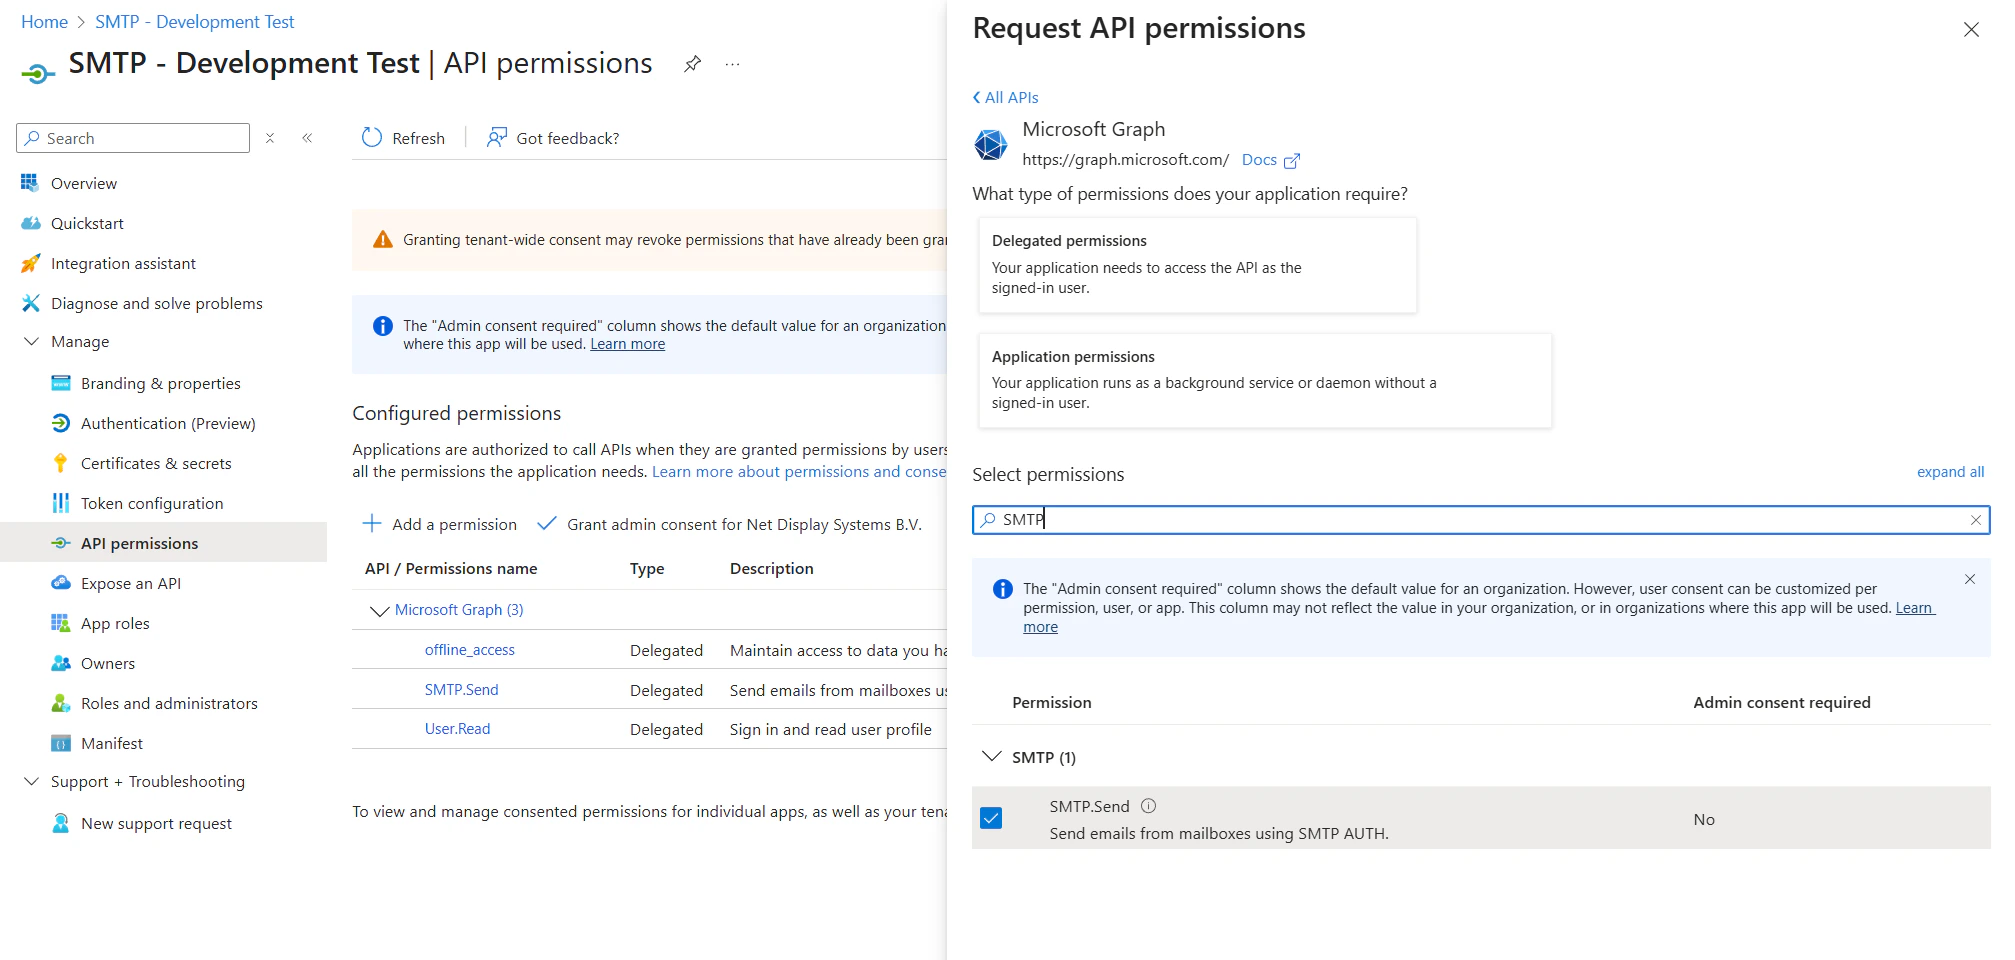
 * Search for permission **SMTP.Send** and this permission as well.
 ## **5. Configuration in PADS4**
To begin:
* Open your **web browser**.
* Navigate to the **PADS4 server URL** (either a DNS name or IP address).
* Log in using an **Administrator account**.
Once logged in:
* Click on **Dashboard**.
* Use the **Toggle Sidebar** button at the **top-left** of the screen.
* Navigate to **Credentials**.
* Then select **Providers**.
* Click on **New**
## **5. Configuration in PADS4**
To begin:
* Open your **web browser**.
* Navigate to the **PADS4 server URL** (either a DNS name or IP address).
* Log in using an **Administrator account**.
Once logged in:
* Click on **Dashboard**.
* Use the **Toggle Sidebar** button at the **top-left** of the screen.
* Navigate to **Credentials**.
* Then select **Providers**.
* Click on **New**
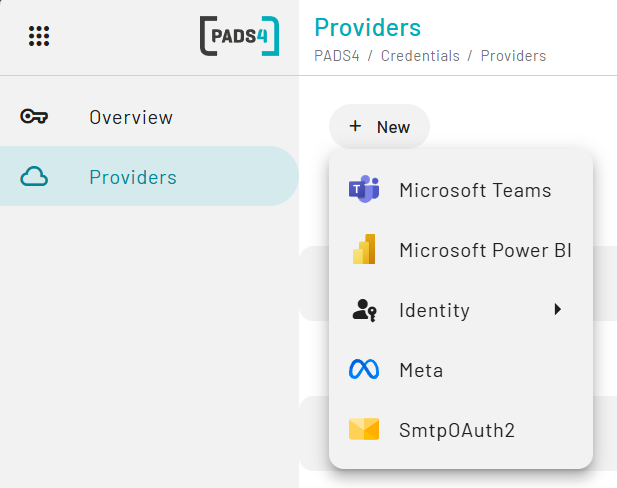 * Select **SMTPOAuth2**
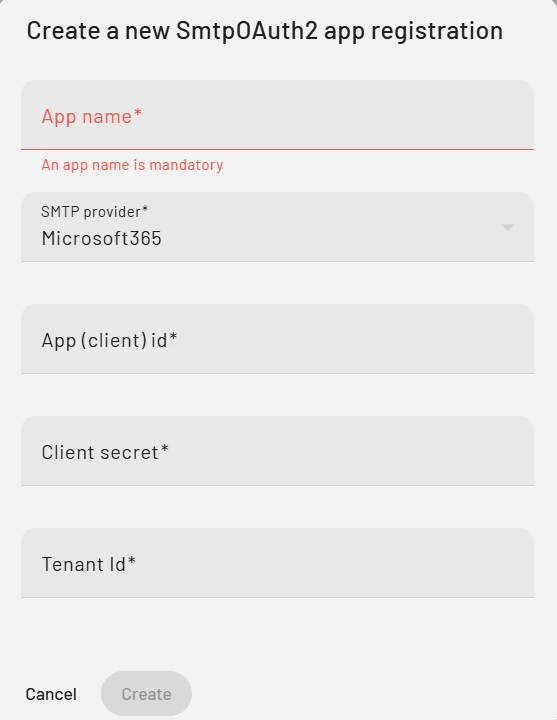 * Fill in the information as follows:
* **App name:** Represent the name of your provider in PADS4 (can be any value)
* **SMTP Provider:** Microsoft
* **App (client) ID:** Application ID from Azure/Entra ID described at the end of step 1
* **Client Secret:** Retrieved from Azure/Entra ID described at the end of step 1
* **Tenant ID:** Directory ID from Azure/Entra ID described at the end of step 1
* Click on **create**
* Now go to the overview page and select the SMTP provider that you have just configured.
* Click connect, choose your user account and grant the request access.
## How to use this set up in the SMTP configuration.
Once logged in:
* Click on **Home**.
* Use the **Toggle Sidebar** button at the **top-left** of the screen.
* Navigate to **Config**.
* Then press **Edit**
* Fill in the information as follows:
* **App name:** Represent the name of your provider in PADS4 (can be any value)
* **SMTP Provider:** Microsoft
* **App (client) ID:** Application ID from Azure/Entra ID described at the end of step 1
* **Client Secret:** Retrieved from Azure/Entra ID described at the end of step 1
* **Tenant ID:** Directory ID from Azure/Entra ID described at the end of step 1
* Click on **create**
* Now go to the overview page and select the SMTP provider that you have just configured.
* Click connect, choose your user account and grant the request access.
## How to use this set up in the SMTP configuration.
Once logged in:
* Click on **Home**.
* Use the **Toggle Sidebar** button at the **top-left** of the screen.
* Navigate to **Config**.
* Then press **Edit**
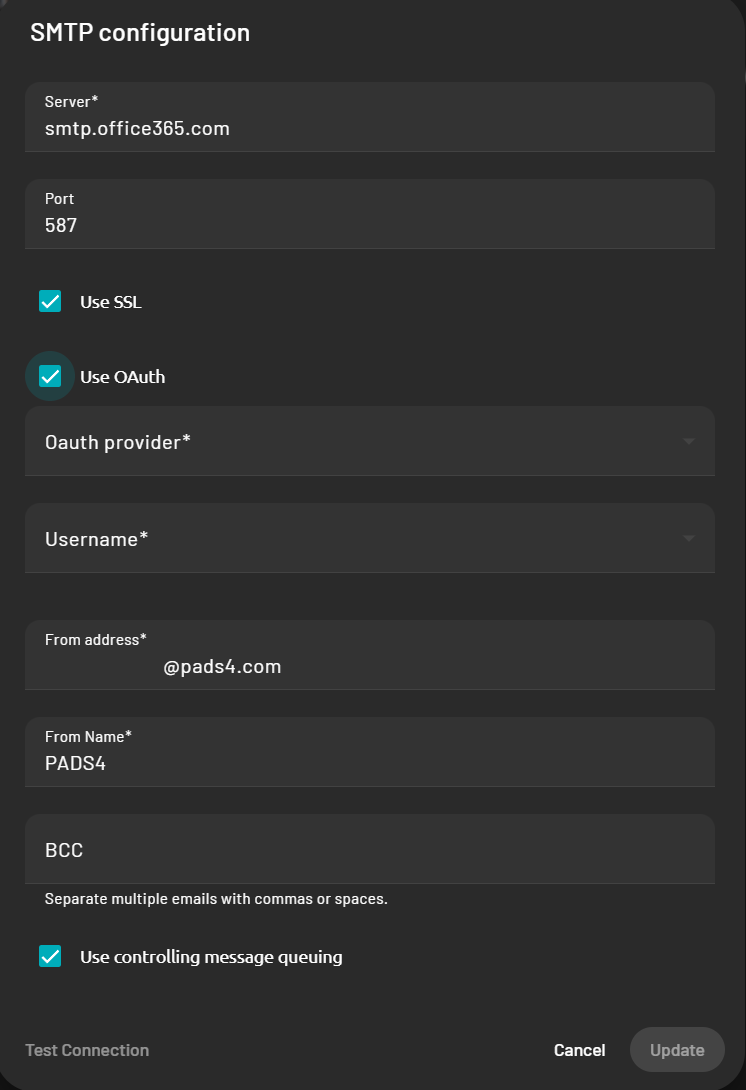 * Turn on **Use OAuth**
* Select your just configured OAuth provider and Username.
* Fill in the rest of your SMTP server and address details
* You can then test the connection at the bottom left which will return a green checkmark if the connection is properly configured.
* Turn on **Use OAuth**
* Select your just configured OAuth provider and Username.
* Fill in the rest of your SMTP server and address details
* You can then test the connection at the bottom left which will return a green checkmark if the connection is properly configured.
